Inmate PAN Registration
Overview
If enabled at your agency or facility, the Inmate PAN Registration function provides an automated method for an inmate to request the registration of a called party number to their Personal Allowed Numbers (PAN) list. This function also enables an authorized ENFORCER® user at the correctional facility to review and approve or reject each called party number requested by an inmate for addition to their PAN list.
Additionally, an authorized user can set the number of PANs a specific inmate can have on their PAN list. The current default of 20 is used for all inmates unless changed globally by the System Administrator or changed manually by an authorized user. The maximum number of PANs for an inmate is displayed in the Calling Rules pane on their Inmate Detail page. For more information, click here.
The Inmate PAN Registration function is accessible by selecting Inmate PAN Registration under the Inmate tab.
Depending on the configuration of The ENFORCER® at your facility, the Inmate PAN Registration function is one of several available methods to add PANs to a PAN Edit page. For descriptions of the other available methods, click here.
Benefits
The Inmate PAN Registration function offers the following benefits to the correctional facility:
- Provides a practical, higher-security alternative to allowing an inmate to select their PANs without facility approval.
- Enables facility administrative personnel to remove certain phone numbers based on recent criminal activity or suspicious/undesirable called party numbers.
- Enables the assignment of evaluating and approving requested inmate PANs to a designated authorized ENFORCER® user.
How PAN Registration Works
The process for completing an Inmate PAN Registration requires the following chronological steps:
- The inmate identifies the phone number of a friend or family member.
- The inmate submits the request using the method approved for the facility, which may be through a kiosk or The ENFORCER® IVR. To view the call flow diagram for requesting an inmate PAN through The ENFORCER® IVR, click here.
- By following the prompts in The ENFORCER® IVR, the inmate enters the phone number of the friend or family member. Alternatively, the inmate submits the phone number of the friend or family member and other information about the person who owns the phone number through a kiosk. Either of these actions places the phone number on a PAN Registration list in The ENFORCER® with a status of Pending Approval.
- An authorized user can click on Inmate PAN Registration under the Inmate tab to view the pending list. For each requested number, the authorized user can:
- Look up the phone number.
- Perform further actions to investigate the owner of the phone number.
- Add notes during the evaluation process.
- Approve or reject the inmate’s request for that phone number.
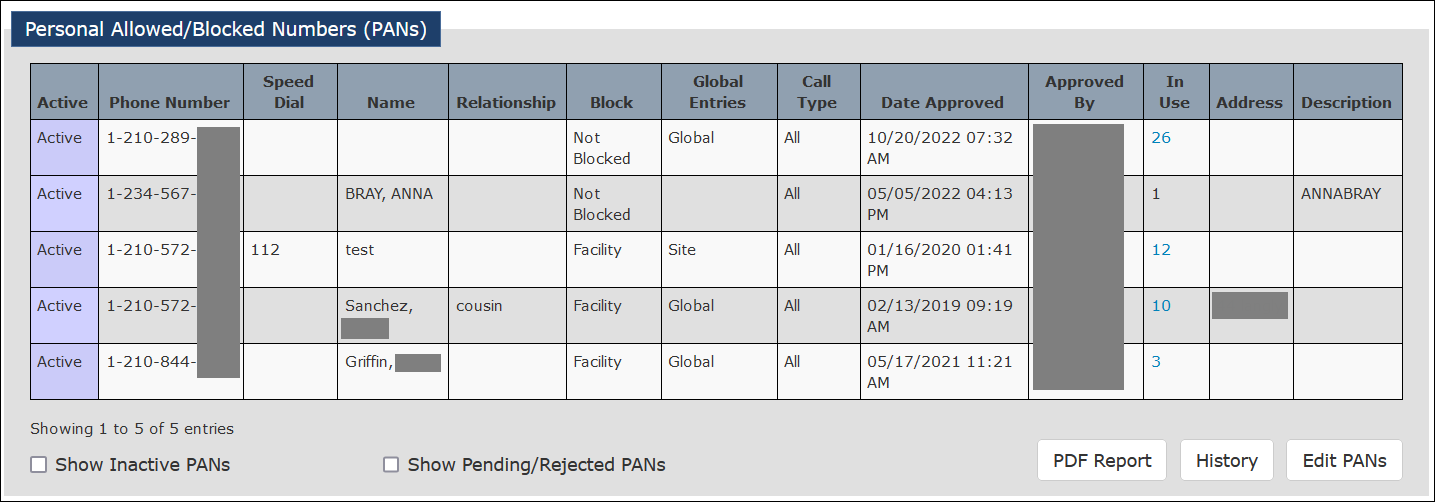
- After a PAN has been approved for an inmate, The ENFORCER® automatically adds the number to the inmate’s Inmate PAN list, which is accessible in the Personal Allowed/Blocked Numbers (PANs) pane on the Inmate Detail page as shown in the following example.
Performing PAN Registration Searches
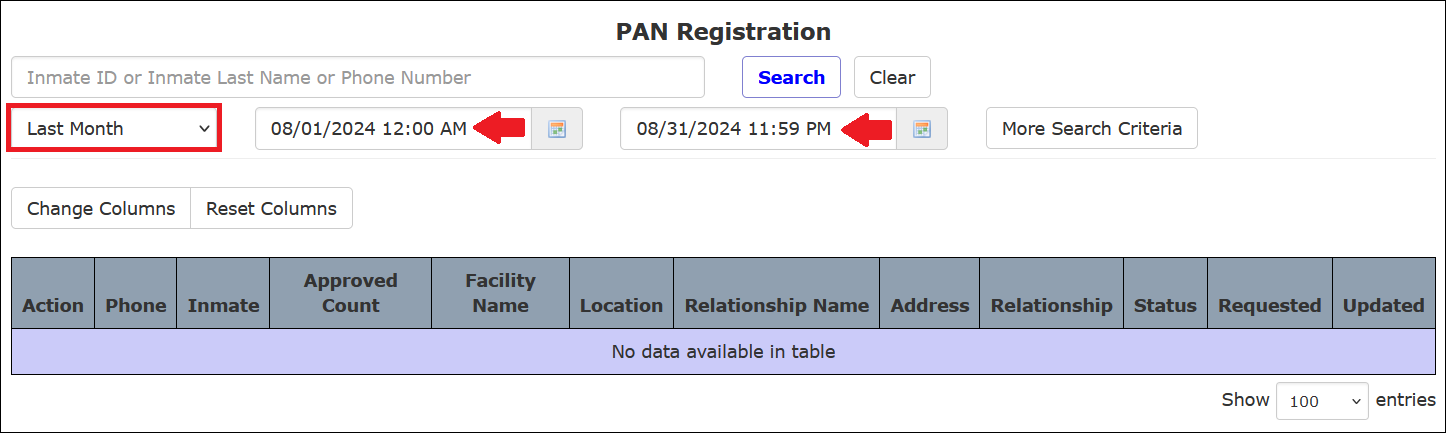
When you access the Inmate PAN Registration function, a search dialog is displayed on the top half of the page in The ENFORCER® as shown in the following example.

This search dialog enables you to:
- Search for all requests by specified date range using the Start Date and End Date dropdown calendars or one of several frequently usedDate Range shortcuts.
- Search for a request by the 10-digit phone number. This is the called party number requested by an inmate.
- Search for a request by the Inmate ID or last name of the inmate who requested it.
- Search for all requests for a selected category. For example, Pending Approval, Pending + Rejected, Approved, Rejected, or All.
- Search for all requests by Facility Name at multi-site agencies only.
- Customize search results to display selected columns only or all columns.
Searching by Inmate Name, Inmate ID, or Requested Phone Number
When you search by entering an inmate name, inmate ID, or requested phone number, The ENFORCER® displays a dropdown list that includes search results containing the letters or numbers you entered. In the following example, the dropdown list shows all inmates whose names contain the letters la. Click on the desired inmate or phone number in the dropdown list to select it.

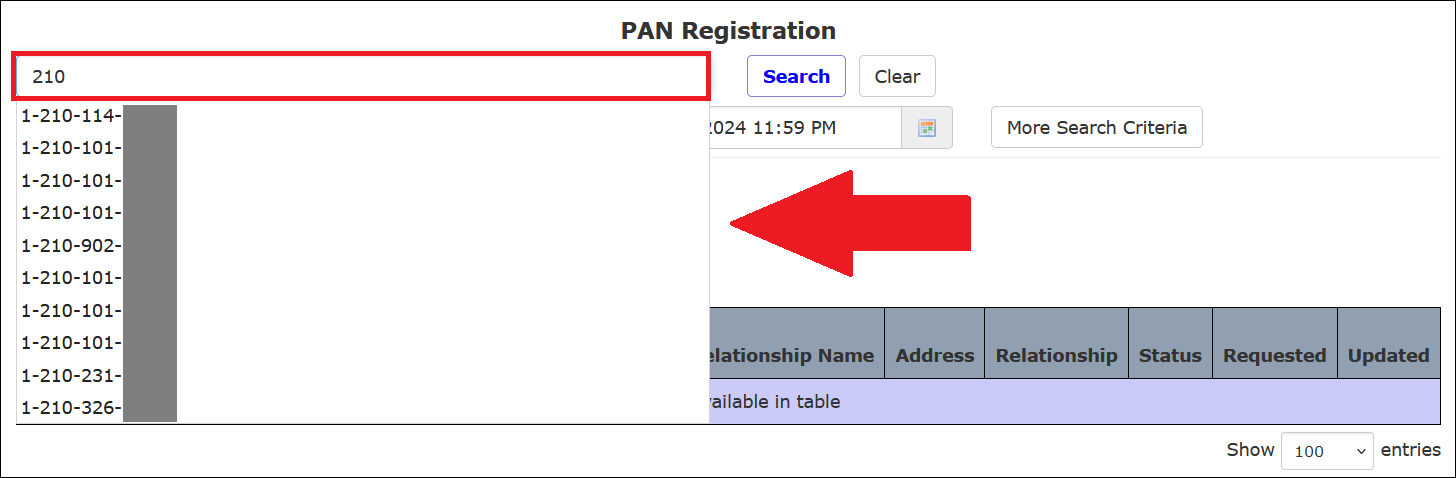
The following example shows the dropdown list displaying all called party phone numbers containing 210.
By default, if you leave the Inmate ID or Inmate Last Name or Phone Number field blank, PAN Registration search results will display all Pending Approval requests from all inmates for all requested phone numbers for the specified or default date range.
Searching by Date/Time Range
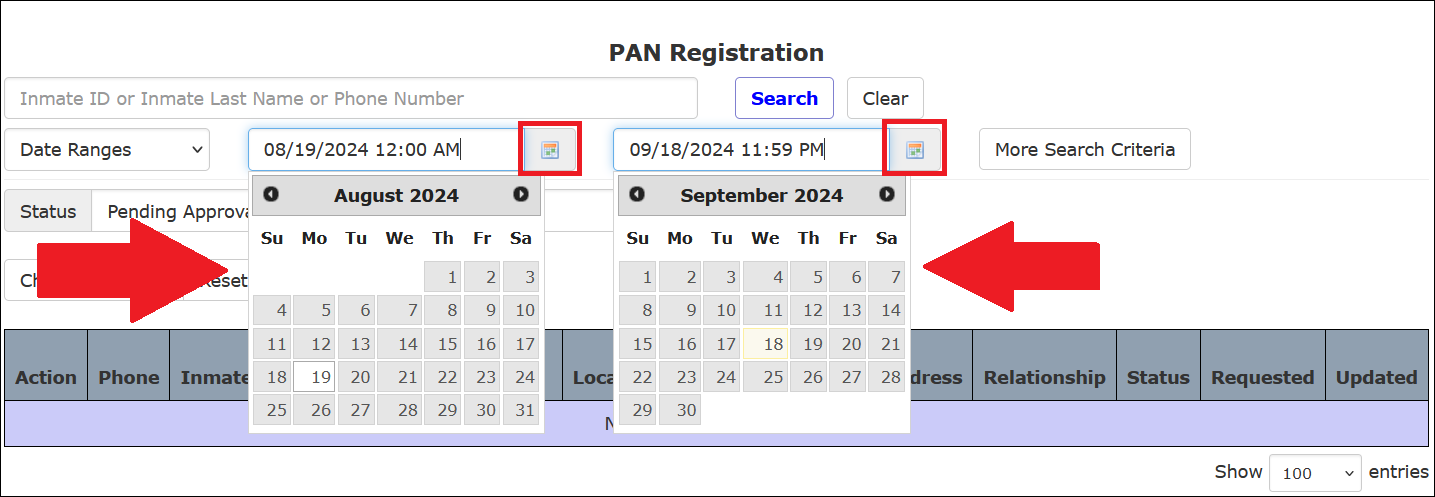
When you navigate to the PAN Registration search page, search results are automatically displayed for the previous 30 days up to the current date. You can specify a more detailed date range for a search by clicking ![]() next to either date field to display a calendar from which you can select a different start date and end date.
next to either date field to display a calendar from which you can select a different start date and end date.
Also, a list of frequently used date ranges can be displayed by clicking the Date Ranges field on the left side of the page.
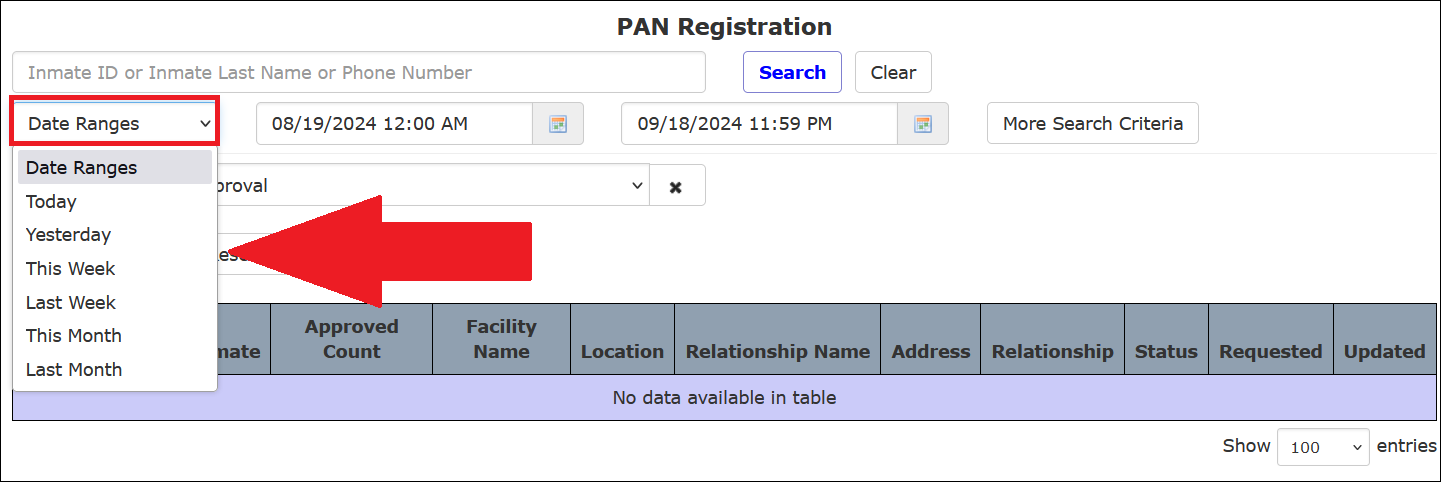
When you click a date range option on the selection list, the start and end dates automatically populate with the date selections. For the start date, the time defaults to midnight on that day. For the end date, the time defaults to 23:59:59. In the following example, the user selected Last month from the Date Ranges selection list.
The This Week option refers to the previous Monday through the upcoming Sunday based on the current date. Last Week refers to the seven days leading up to the calendar date of the most recent Sunday.
Limiting a Search Using Additional Criteria
A dialog box will display additional search criteria after you click More Search Criteria on the PAN Registration page. These criteria are grouped behind the two buttons shown in the following example.
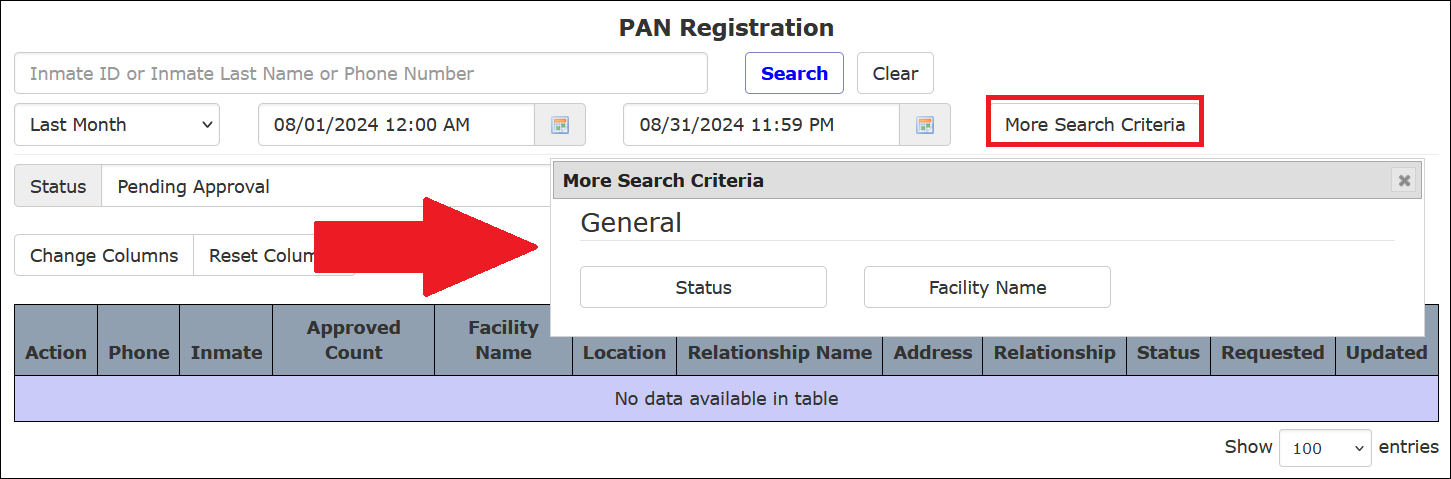
Each time you click on an additional criterion, a dialog box for that criterion is added to the PAN Registration search page, and the More Search Criteria box closes. The following example shows that both optional search criteria have been selected. As a result, a dialog box is displayed for each of the two selected criteria.

To select a Status, click ![]() to view a dropdown list from which you can select one option only. To view a list of Facility Names, click
to view a dropdown list from which you can select one option only. To view a list of Facility Names, click ![]() . You may select one or more checkboxes for the Facility Names.
. You may select one or more checkboxes for the Facility Names.
Changing Displayed Columns
You may add or remove columns from the displayed PAN Registration list. Click Change Columns to display a list of all available columns. By selecting or deselecting one or more checkboxes, you can include or omit those column headings from the PAN Registration search results. You can change columns on the PAN Registration screen before or after submitting a search. Click Reset Columns to display only the default columns.

If you specified one or more Facility Names in your search, you must select the Facility Name checkbox to display this information in the search results.
Working with PAN Registration Search Results
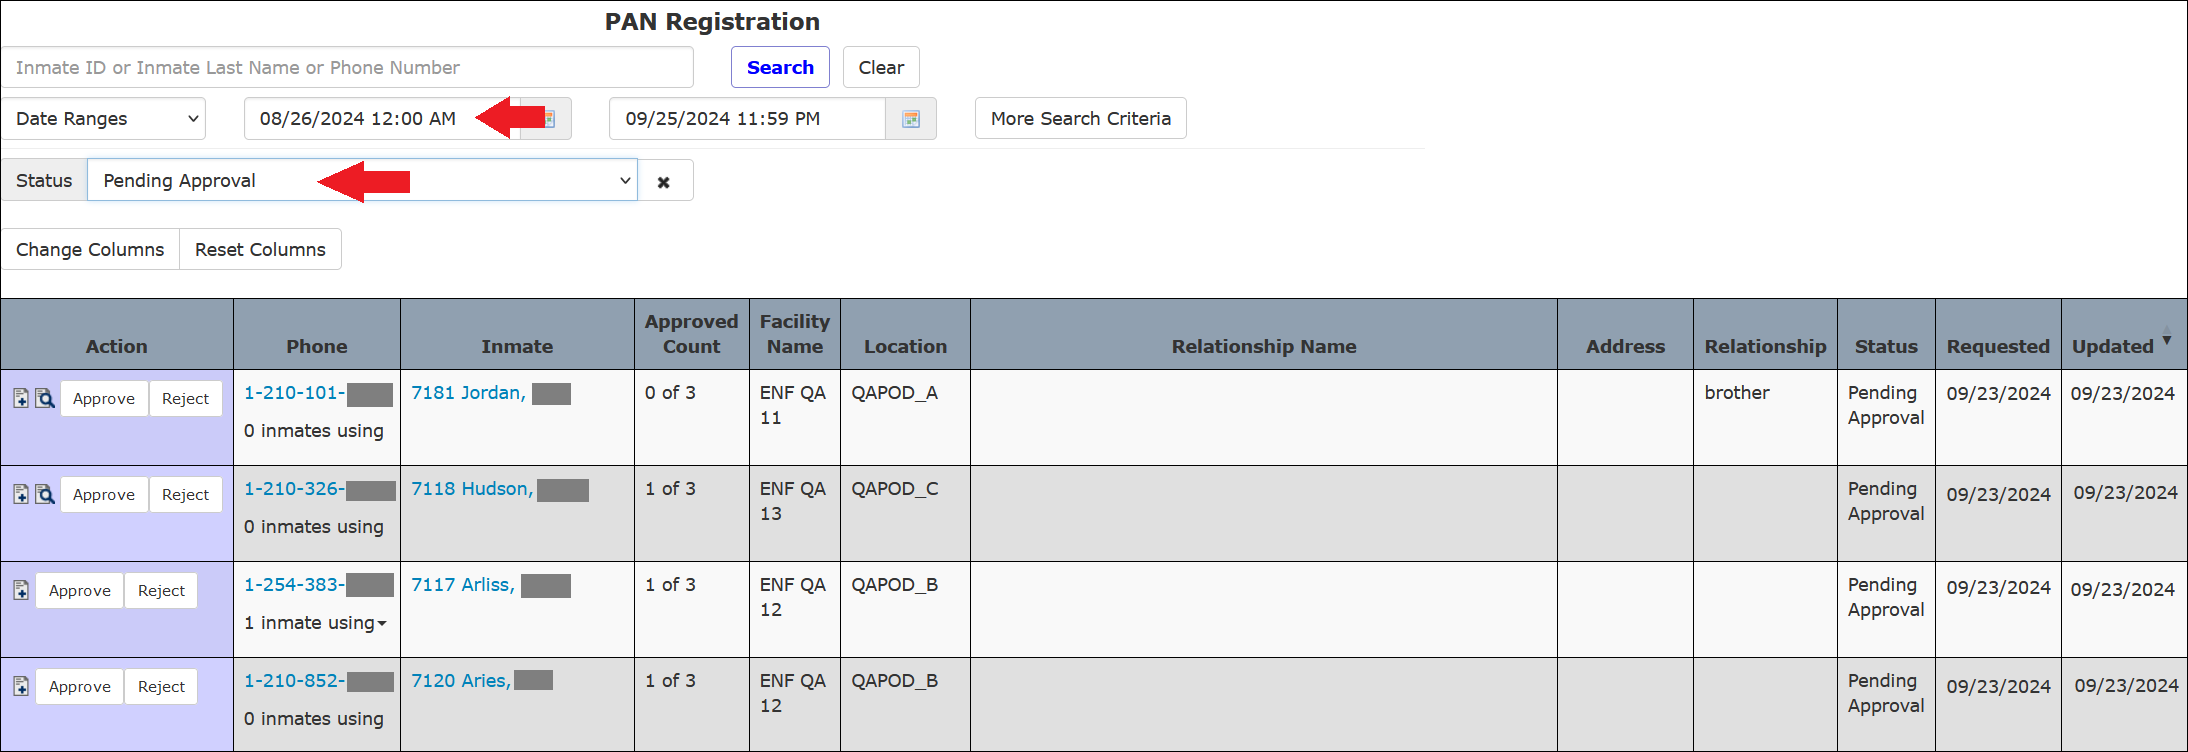
After you select Inmate PAN Registration under the Inmate tab, the PAN Registration page automatically displays search results for the previous 30 days up to the current date, as shown in the following example. For the start date, the time defaults to midnight on that day. For the end date, the time defaults to 23:59:59.
Since the PAN Registration page is accessed most frequently to approve or reject new inmate requests, the search results page displays a list of all requests that are Pending Approval by default, as shown in the following example. This default view shows only PAN registration requests submitted by inmates but not yet approved.
Since the displayed entries have not been approved yet, the  and
and  buttons are displayed in the Action column.
• If your facility is configured to enable inmate PAN requests to be submitted through an inmate kiosk, the requesting inmate can submit detailed information about the called party number, which may include the called party’s name, address, and relationship to the inmate.
• If your facility is configured to enable inmate PAN requests to be submitted through The ENFORCER® IVR, the requesting inmate can submit the phone number only for the called party. Consequently, certain columns in line items on the PAN Registration search results may be blank.
PAN Registration Search Results – Column and Icon Descriptions
The following table describes, by column heading, the information displayed on the PAN Registrationpage for each number requested by an inmate.
| Column Heading/Icon | Description |
|---|---|
Action    | • These buttons are displayed on requests that have not been approved or rejected by the user and are still Pending Approval. • Displayed after the user approved the request. • Displayed after the user rejected the request. • Click this icon to add a note to the request. You can add a note to an inmate PAN request before or after approval or rejection. • After adding a note, click this icon to view the note. |
| Phone | Called party phone number. |
| Inmate | Inmate ID and inmate name. |
| Approved Count | The number of currently approved PANs for the inmate. |
| Facility Name | Name of the Facility where the inmate is housed. This information is displayed for multi-site agencies only. |
| Location | Housing location of inmate, if available. |
| Relationship Name | Name of the called party, if available. |
| Address | Address of the called party, if available. |
| Relationship | Called party’s relationship to the inmate, if available. |
| Block Type | This column will display Not Blocked unless the number is blocked for any reason after the number has been approved for the inmate’s PAN list. If so, the block type is displayed in this column. For more information on block types, click here. |
| Status | Status of the inmate’s request. For example, Pending Approval, Pending + Rejected, Approved, Rejected, or All. |
| Requested | Date when the inmate submitted the PAN request through The ENFORCER® IVR or an inmate kiosk. |
| Updated | Date when the request was updated by either the authorized user to approve or reject the request or by The ENFORCER® to display a post-approval block on the called party number. |
Displaying Additional Information for a PAN Request
From the PAN Registration search results, related information can be accessed for each request using items displayed in the Phone and Inmate columns, as shown in the following example.
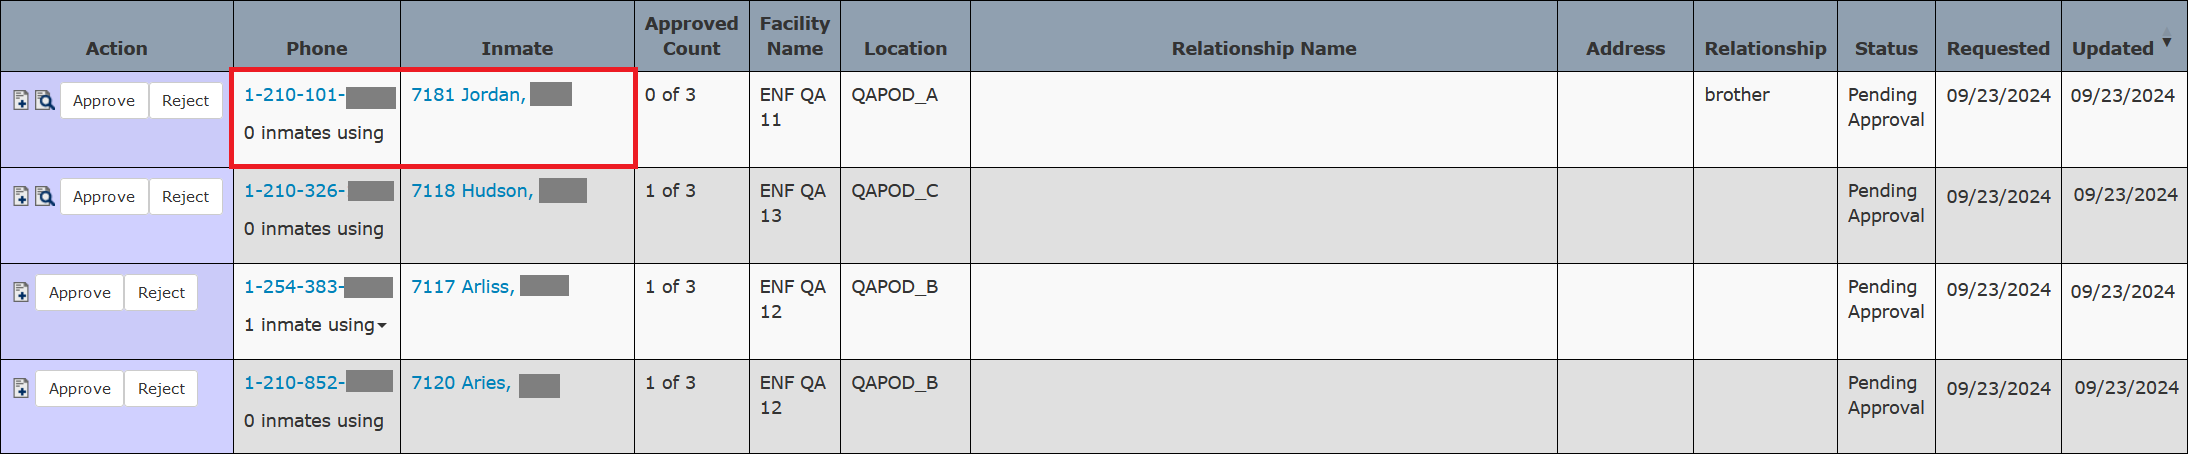
PAN Registration Screen – Accessible Related Information
The following table describes each item that may be displayed in these columns, how you access it, and what additional information is available.
| Page Item | User Action | What Information is Available |
|---|---|---|
| Phone number hyperlink | Mouse click | Indication of whether the called party number already has a Number Detail Record stored in the Global Numbers library and details about that record. Additionally, if the called party number currently appears on the PAN list for any other inmates, this will indicate the inmate ID(s) and name(s) of those inmate(s). |
| Global Number | Mouse click | Indicates that the called party number has an entry in the Global Numbers library. To view more details, click the Phone Number hyperlink described in the column above. |
| # inmates using | Click | Lists each inmate's ID and name using the PAN phone number. Click the Phone Number hyperlink to view more details. <WRAP info>If the inmate's PAN request has not been approved yet, the inmate who submitted the request is not included in this count. After you approve an inmate PAN request, this number will increase by a value of 1 when your search results include Approved phone numbers. |
| Inmate ID / Inmate name hyperlink | Mouse click | Displays the PAN Edit page for the inmate’s PAN list. 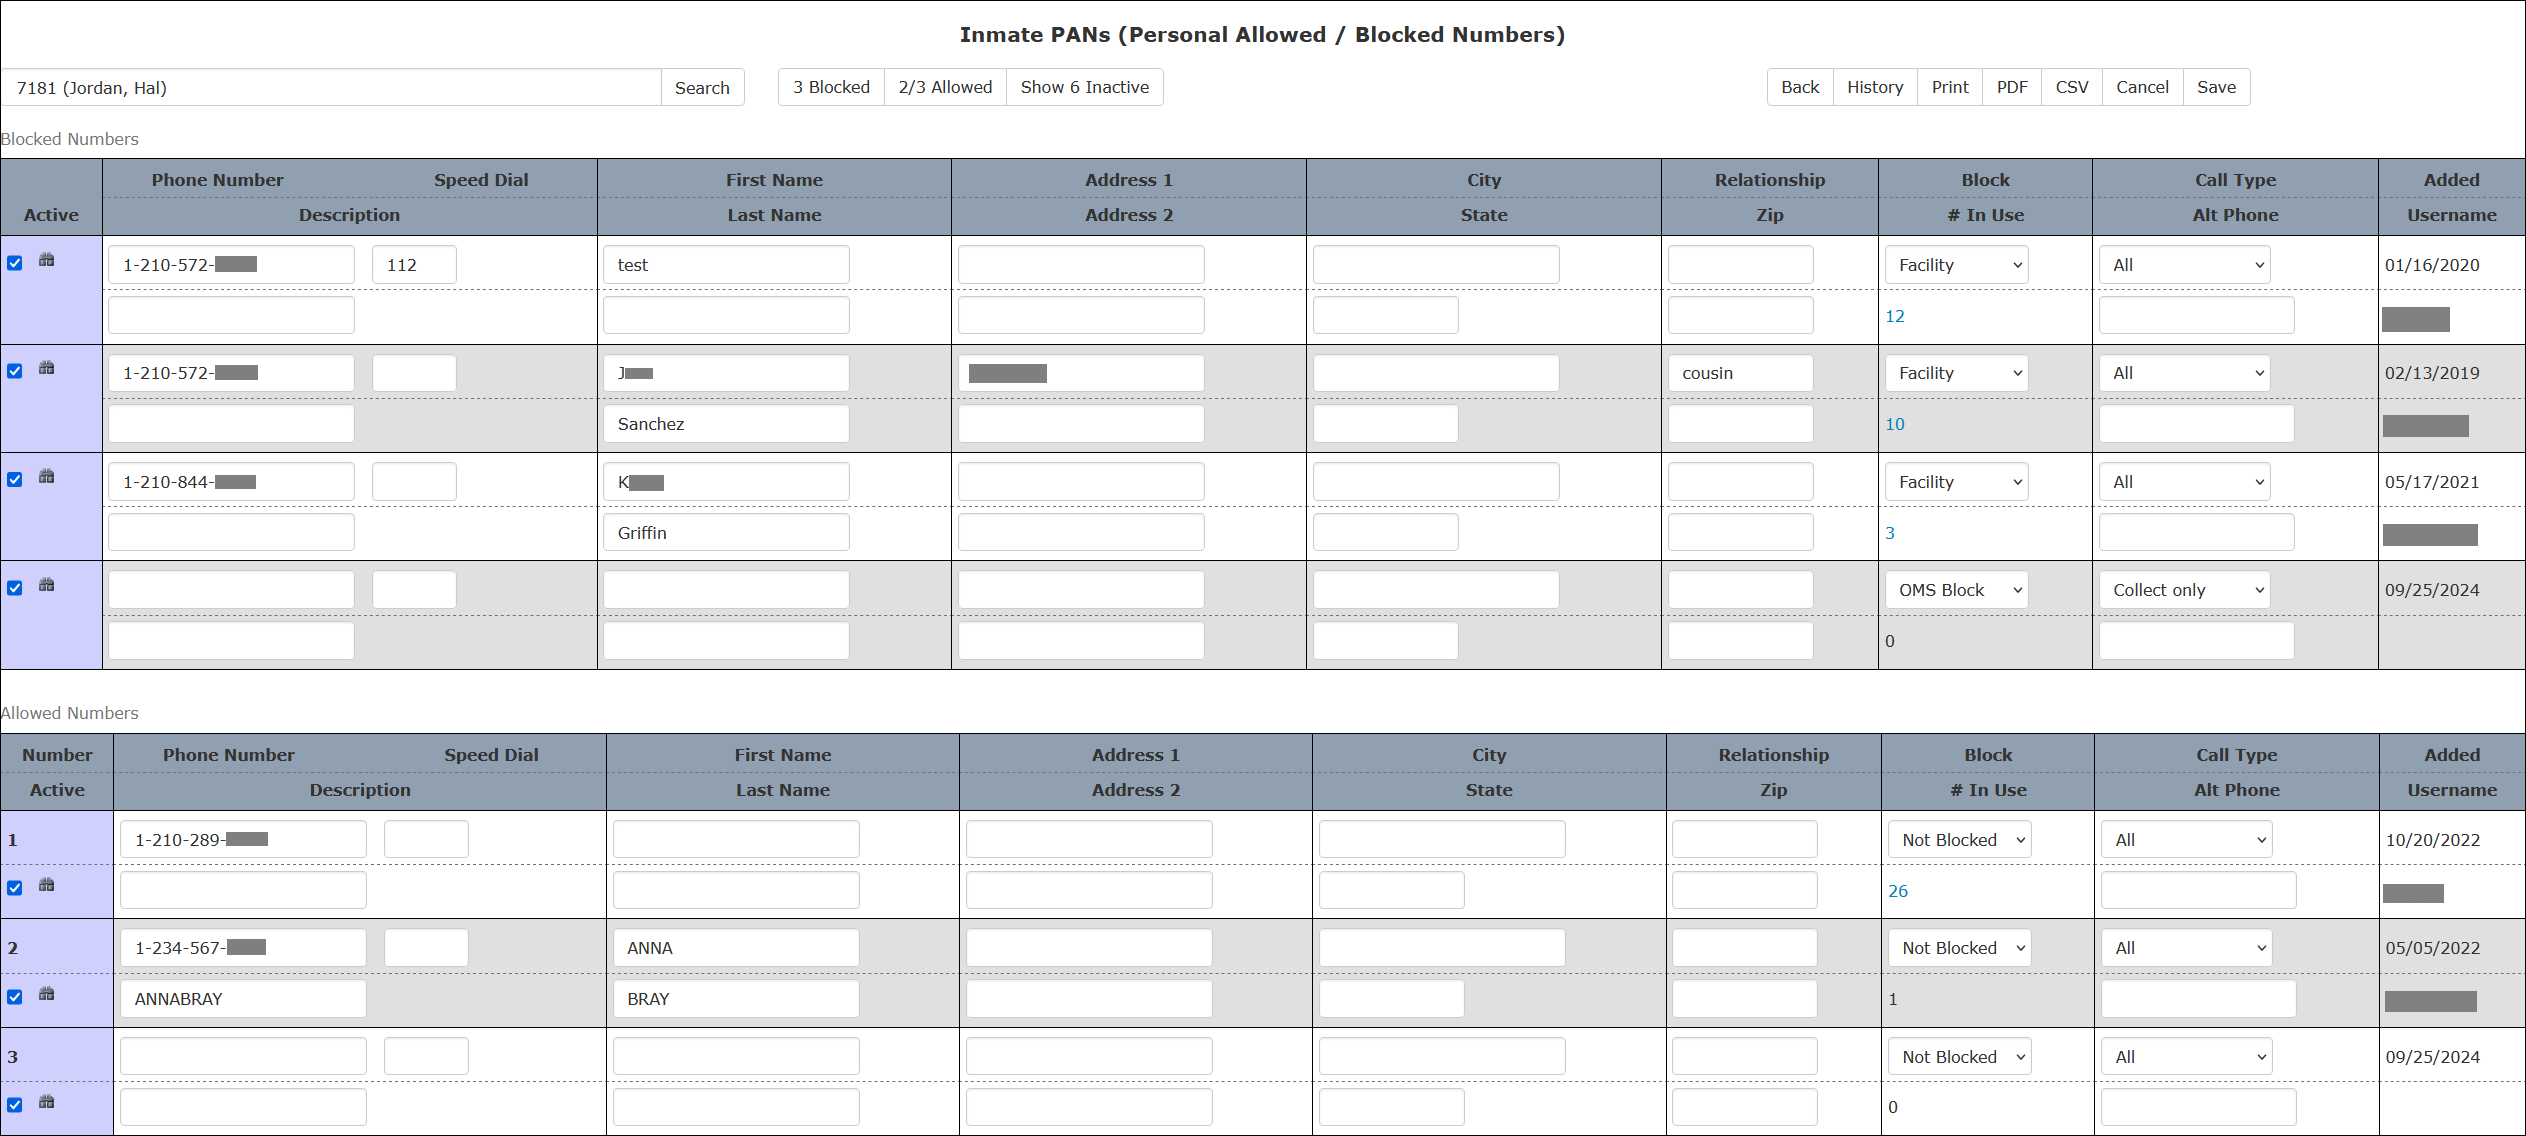 |
Sorting Columns
Any column on the PAN Registration page can be sorted in ascending or descending order by clicking the column heading.
![]() is displayed next to the column heading when you perform this action.
is displayed next to the column heading when you perform this action.

To sort the information in the reverse order, click the column heading again.
Approving or Rejecting an Inmate PAN Registration Request
To approve or reject an inmate PAN request, locate the line item for the phone number on the Pending Approval list, and then click or in the Action column.
![]()
Effects of Approving or Rejecting a PAN Registration Request
After you click or for a requested PAN, the line item for the phone number will be removed from the Pending Approval list. The line item for the phone number will now be displayed in the Approved or Rejected and Pending + Rejected lists.  in the Action column will be replaced with
  or
or  .
.
Each time you approve or reject a requested PAN, one of the following messages is displayed at the top of the page.

After you approve an inmate PAN request, the phone number is added automatically to the inmate’s PAN list.
After you reject an inmate PAN request, the phone number cannot be added to the inmate’s PAN list unless the inmate submits a new request for that same phone number.
Adding a Note to a Rejected PAN Registration Request
When you reject an inmate’s PAN registration request, you must enter a note to describe why you are rejecting the request before The ENFORCER® will process the request. Doing so allows you to create a historical record in case the rejected request is accessed later for informational purposes if the inmate submits a new PAN request for the same phone number. If you do not enter a note, The ENFORCER® displays an error message and will not allow you to save the rejected request.
Immediately after you click on a PAN request line item, the following note dialog box is displayed:
![]()
Enter a description of why you rejected the request and click Save.

Overriding the Maximum Number of PANs per Inmate
By default, 20 is the maximum number of PANs per inmate. As the PAN administrator, you can override the maximum number of PANs allowed for an inmate. For example, if the inmate already has 20 active PANs on their list and you approve additional PANs for that inmate, each new PAN will be approved and added to the inmate’s PAN list. In this case, The ENFORCER® will disregard the default maximum of 20 active PANs.
Adding Notes to an Inmate PAN Registration Request
You can add notes to an inmate PAN request to make it a more useful historical record. Depending on the accepted procedures at your facility for evaluating an inmate PAN request, you may want to add notes to log the following information:
- Any phone calls made to outside parties, including the called party on the number, during the evaluation process.
- Any conversations with other facility personnel regarding the inmate or the called party.
- Brief details regarding the decision to approve or reject the inmate’s request.
How to add and view notes for an inmate PAN Request
- On the PAN Registration page, you can perform a search and locate the number in the list as well as a search directly by phone number, inmate ID, or approval status.
- On the line item for the request, click
 in the Action column.
- A dialog is displayed where you can add and save a note.
- Enter a detailed note, then click Save.
- If notes have been previously added,
 is displayed in the Action column to enable you to view the added note.
 - To view the note, click.
- The text of any saved note is prefaced by the date and time, the function from which the note was saved, and the user ID of the user who created the note.
- To cancel a note before submitting it and clear the text entry field, click Cancel in the Create Note dialog box.