The Communicator℠
Using The Communicator℠ module, a designated administrator at the facility can review inmate requests submitted through The Communicator℠ IVR, and then communicate an approval/denial decision or appointment to the requesting inmate. Similarly, a designated administrative resource can also use The Communicator℠ module to review inmate incident reports submitted through The Informer℠ IVR, and then initiate further action where appropriate.
The Communicator℠ Admin Function and The Communicator℠ IVR
The Communicator℠ Admin function can be set up to accommodate one or more customized categories or subcategories to meet specific requirements for conveying information or accommodating inmate requests at your facility. These requests are submitted by inmates using The Communicator℠ IVR available in The ENFORCER® inmate calling platform.
Some typical ways that The Communicator℠ IVR is used to benefit inmates include:
- Requesting a medical or dental appointment.
- Requesting facility-related information such as the availability of a service for an inmate or an inmate’s scheduled court date.
- Filing a complaint or grievance.
When the inmate leaves a message with The Communicator℠ IVR using one of these categories or subcategories, the associated request is posted in The Communicator℠ module for review and response by an administrative resource at the agency.
The Communicator℠ IVR categories/subcategories and associated inmate prompts can be configured only by The ENFORCER® Site Administrator using The Communicator℠ Admin function. For more information, click here.
To place a request or obtain information through The Communicator℠ IVR, the inmate selects option 4 from The ENFORCER® Main Menu, and then selects option 2 from the Inmate Messaging menu to access the Leave Message menu. After option 2 is selected, The Communicator℠ IVR plays a menu of request categories to the inmate. To view the call flow for initiating an inmate request or information request, click here.
The Informer℠ Admin Function and The Informer℠ IVR
Some ENFORCER® clients mandate that a means be available for inmates to report sexual abuse, assault, violence, or other illegal activity that may occur in the facility. To accommodate different facility requirements, The ENFORCER® calling platform currently offers The Informer℠ Admin function to configure this type of reporting and to make it accessible to inmates through The Informer℠ IVR available in The ENFORCER® inmate calling platform.
The Informer℠ IVR enables inmates to hear up to nine customized prompts that enable them to report sexual assault, criminal acts, abuse, acts of violence, or other incidents anonymously. Each prompt is configured either to enable the inmate to leave a voice message or to automatically dial an external phone number, such as a reporting hotline, a law enforcement agency, or an assigned investigator available through The Informer℠ IVR.
The Informer℠ IVR categories and prompts can be configured only by The ENFORCER® Site Administrator.
To report an incident through The Informer℠ IVR, the inmate selects option 0 from The ENFORCER® Main Menu. After option 0 is selected, The ENFORCER® IVR provides the inmate with a menu of incident reporting categories. To view the call flow for initiating an anonymous inmate incident report, click here.
Since the inmate selects options in The Informer℠ IVR without entering a PIN, The ENFORCER® does not track the identity of the inmate placing the call. For any option configured as OUTDIAL through The Informer℠ Admin function, the IVR automatically dials an external phone number. For any option configured as VOICEMAIL, the voice message left by the inmate is posted in The Communicator℠ module for review by an administrative resource at the agency. Although this administrative resource can listen to the voice message left by the inmate, neither the inmate’s name nor the inmate’s ID is tracked or saved by the system to ensure inmate anonymity.
Using The Communicator℠ Module
Using The Communicator℠ module, a designated administrator at the facility can review inmate requests submitted through The Communicator℠ IVRand then communicate an approval/denial decision or appointment back to the requesting inmate. Similarly, a designated administrator can use The Communicator℠ module to review inmate incident reports submitted through The Informer℠ IVR and initiate further action where appropriate.
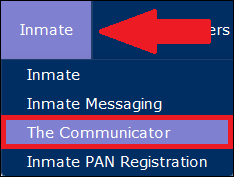
The Communicator℠ module is accessible by selecting The Communicator℠ under the Inmate tab.
By accessing The Communicator℠, the administrator can perform the following tasks:
The following tasks are usually completed in the sequence below.
- Search for requests or incident reports by an inmate, date range, category, or review status.
- Listen to the recorded message left by the inmate.
- Review/consider the inmate request or incident report.
- Where appropriate, type in a response message to the inmate to indicate approval/denial of the request and provide details to the inmate.
- Review an inmate's request or incident report history by date range, category, or review status.
After you select The Communicator℠ under The ENFORCER® Inmate tab, The Communicator℠ screen is displayed as shown in the following example. When you open The Communicator℠ page, search results are displayed automatically for the previous 30 days up to the current date. For the start date, the time defaults to midnight on that day. For the end date, the time defaults to 23:59:59. The Communicator℠ page displays a line item record for each inmate request submitted through The Communicator℠ IVR as well as each inmate incident reported through The Informer℠ IVR.
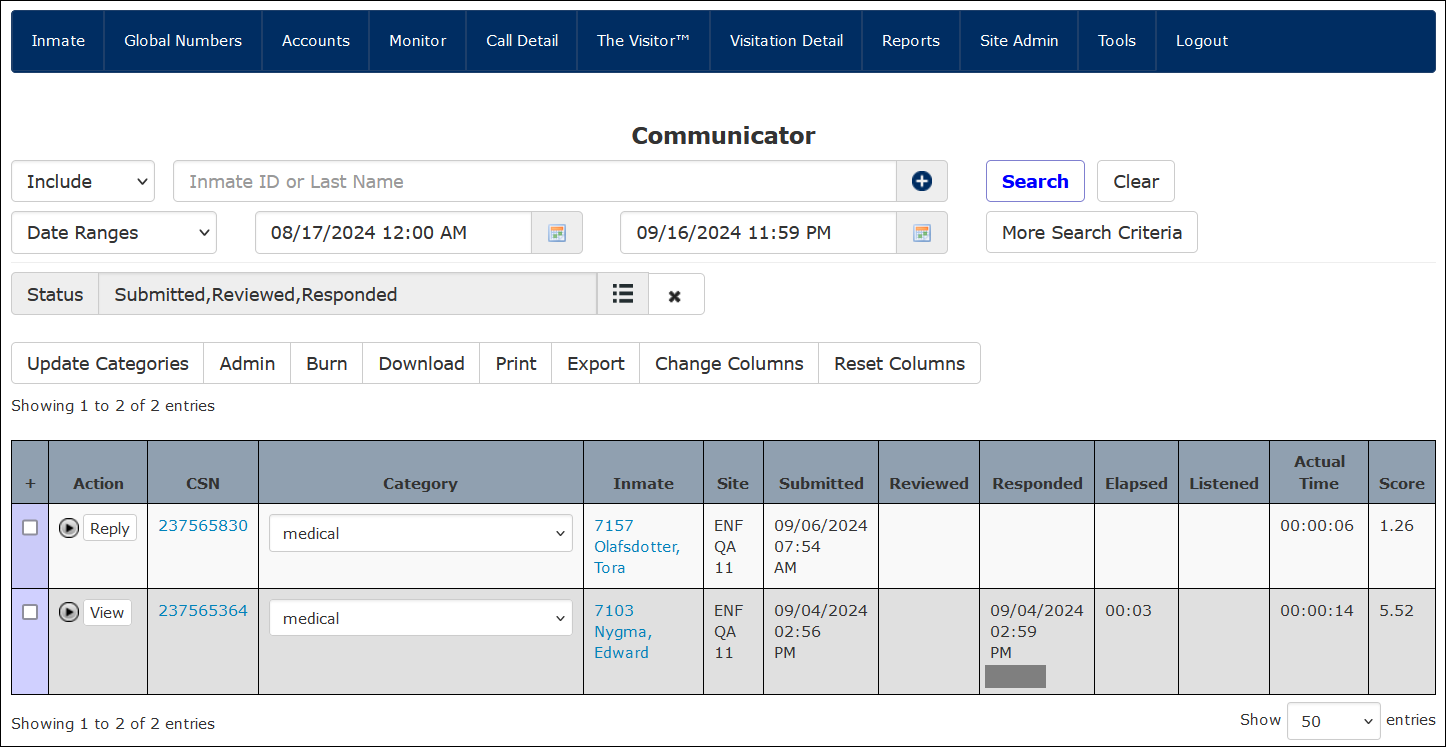
Since The Communicator℠ IVR and The Informer℠ IVR are both optional functions in The ENFORCER®, results may be displayed for only one of these IVRs depending on the configuration at your agency or facility.
Searching by inmate
When searching by inmate name or inmate ID to locate inmate requests or incident reports, The ENFORCER® makes it easy to identify a specific inmate by providing a dropdown list. This list displays all inmate names containing the characters you enter. In the following example, the dropdown list shows all inmates whose names contain the characters nyg. Click on the desired name in the list to select it.

If you leave the Inmate ID or Last Name field blank, The Communicator℠ will display all inmate requests for the specified date range.
Searching by Date/Time Range
When you open The Communicator℠ search page, the date range for the search defaults to the previous seven days up to the current date. For the start date, the time defaults to midnight on that day. For the end date, the time defaults to 23:59:59.
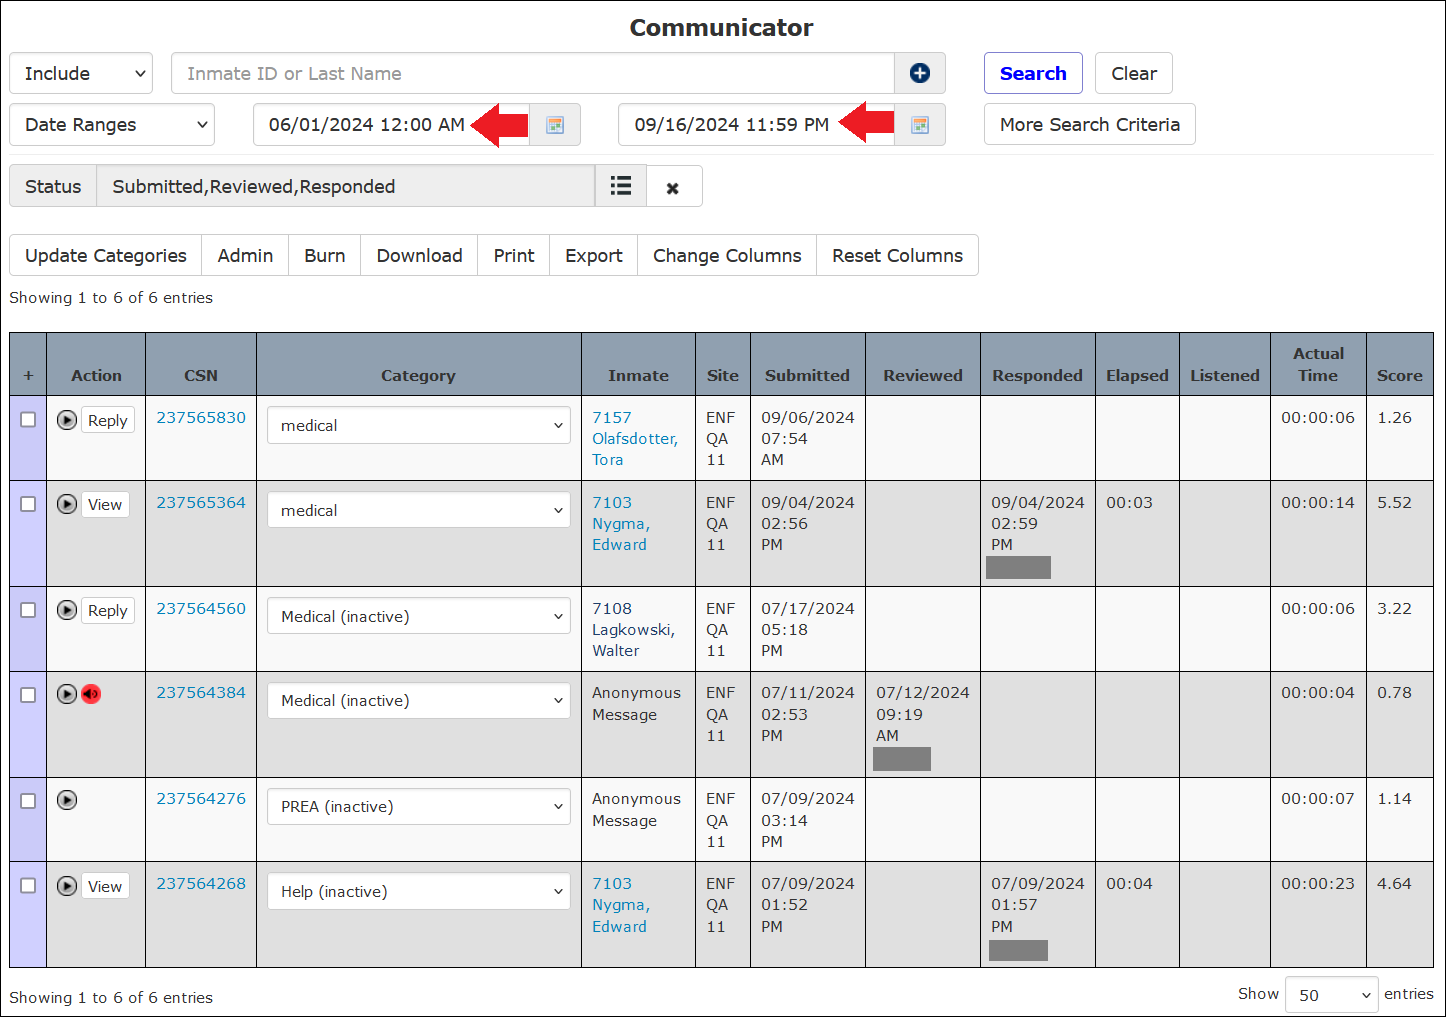
You can specify a more detailed date range for a search by adding the time of day to the selected start and end dates. Depending on your User Settings, you may use 12-hour or 24-hour time. You must make the time changes manually in the displayed start time and end time fields shown in the following example.

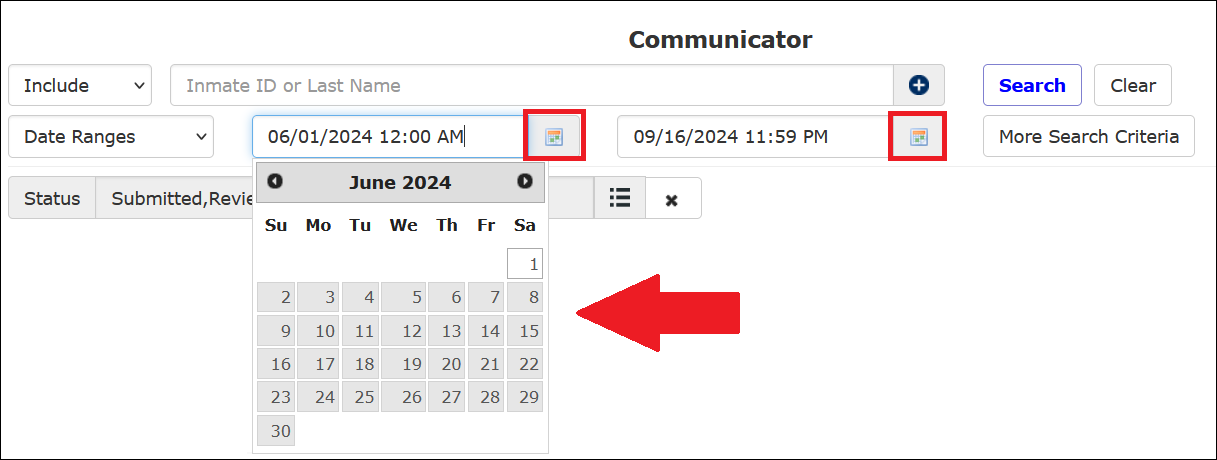
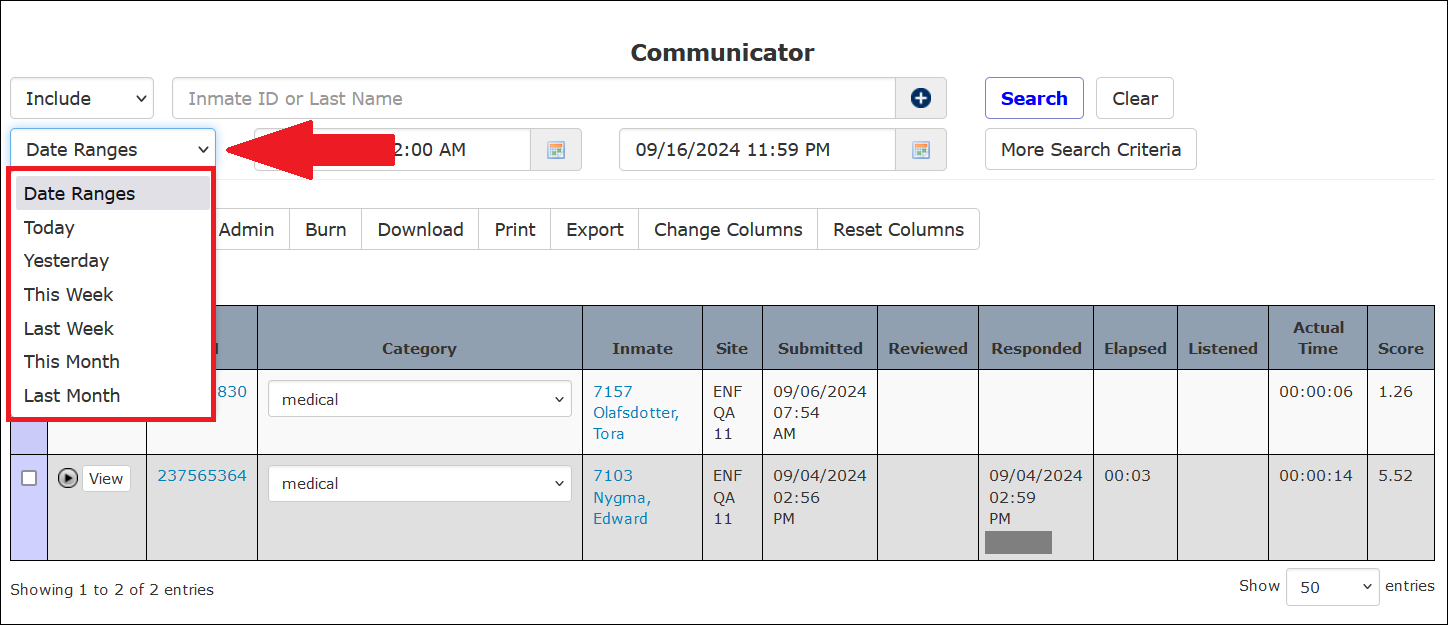
Additionally, a dropdown list of frequently used date ranges can be displayed by clicking ![]() in the Date Ranges field on the left side of the page.
in the Date Ranges field on the left side of the page.
When you click a date range option on the selection list, the start and end dates automatically populate with the date selections. For the start date, the time defaults to midnight on that day. For the end date, the time defaults to 23:59:59. In the following example, the user selected Last Month from the Date Ranges selection list.

The This Week option refers to the previous Monday through the upcoming Sunday based on the current date. Last Week refers to the seven days leading up to the calendar date of the most recent Sunday.
Limiting a Search Using Additional Criteria
After you click More Search Criteria on The Communicator℠ page, a dialog box that lets you specify several additional search criteria is displayed. These criteria are grouped behind five buttons as shown in the following example.
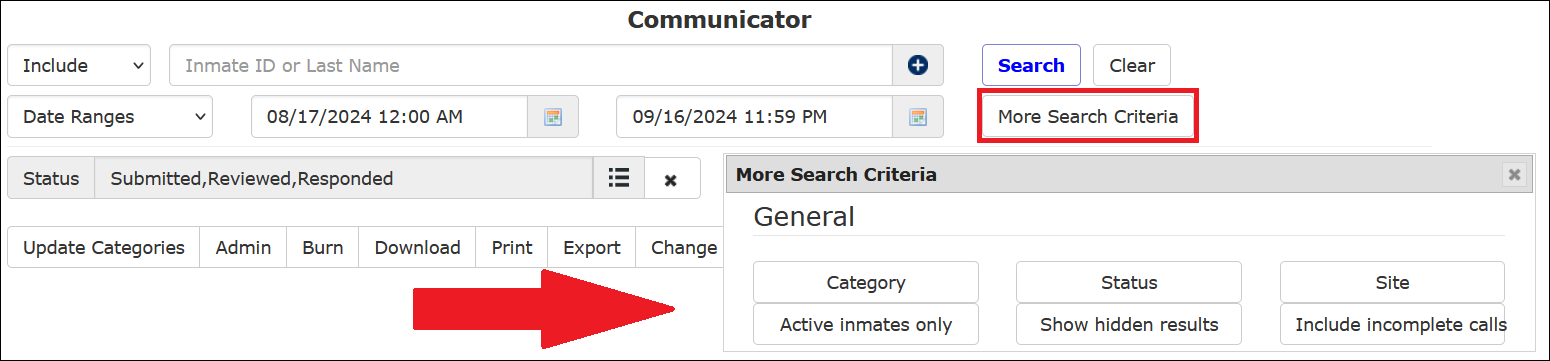
Each time you click on an additional criterion, a dialog box for that criterion is added to The Communicator℠ search page, and the More Search Criteria box automatically closes. In the following example, the user selected Category. Afterward, the More Search Criteria box automatically closed, and a Category field was added to the page, enabling the selection of one or more categories.

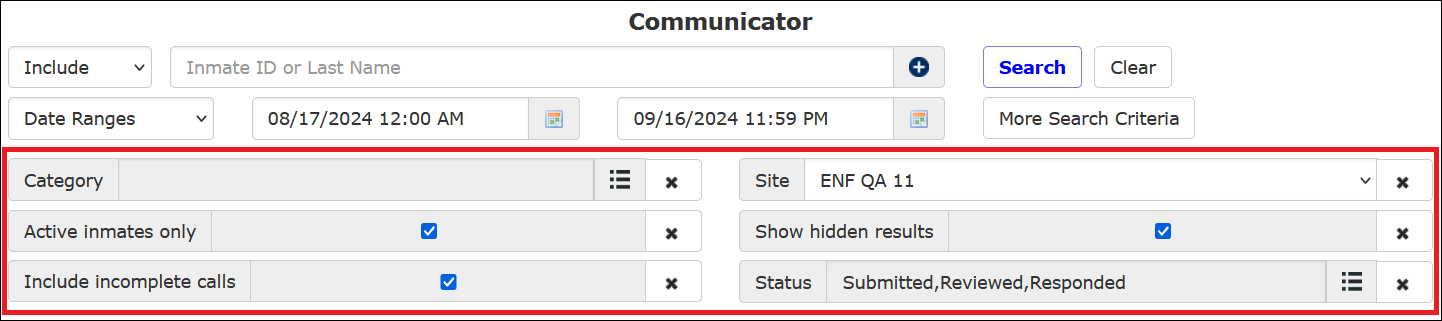
The following example shows that all five optional search criteria have been selected.
If the selected criterion allows multiple selections, ![]() will be displayed in the field. Click
will be displayed in the field. Click ![]() to view the list and select one or more options.
to view the list and select one or more options.
You can select one or more items from the list when ![]() is displayed.
is displayed.
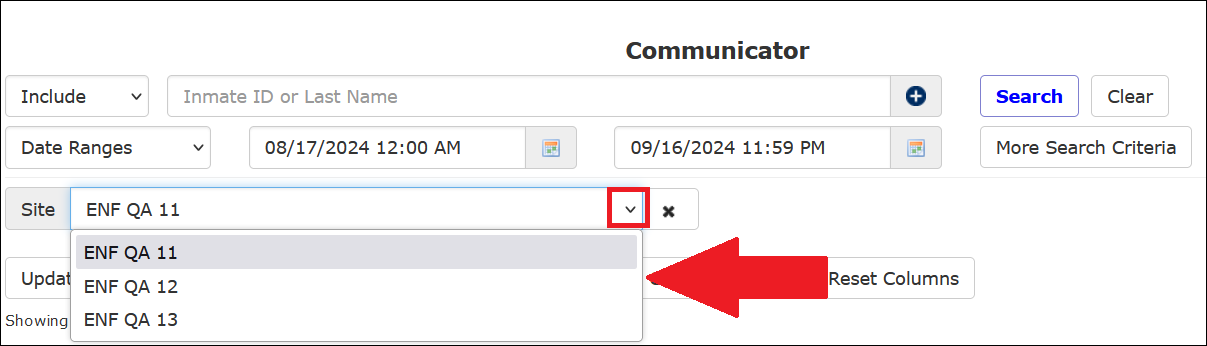
If the selected criterion enables you to make one selection only, ![]() will be displayed in the field. Click
will be displayed in the field. Click ![]() to view a dropdown list from which you can select one option only.
to view a dropdown list from which you can select one option only.
A checkbox will appear in the field indicating whether the selected criterion requires activation or deactivation only. Click on the checkbox to select or deselect it.

The following table describes the additional search options behind the More Search Criteria button.
The Communicator℠ More Search Criteria Options
| Optional Additional Criteria | Description |
|---|---|
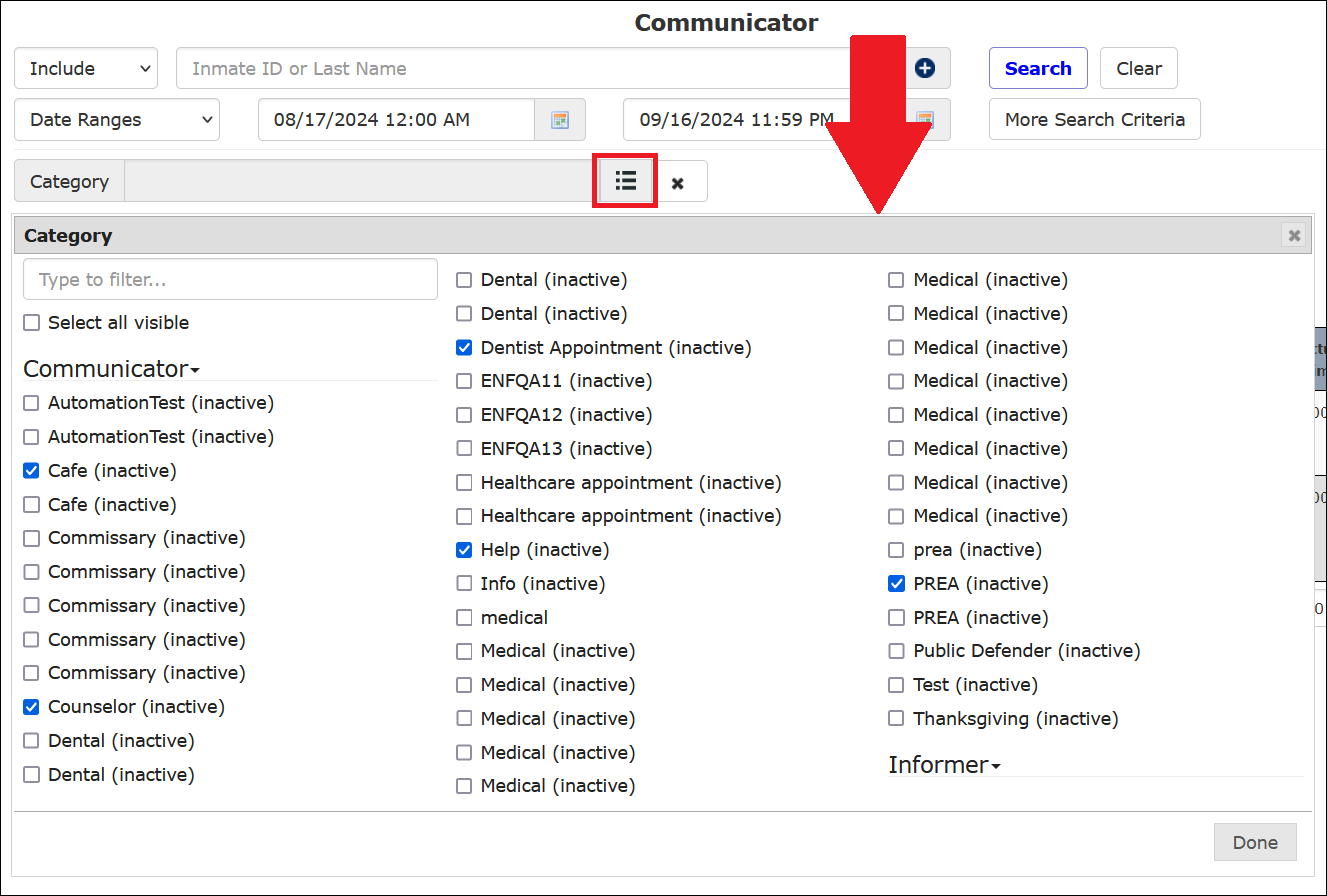
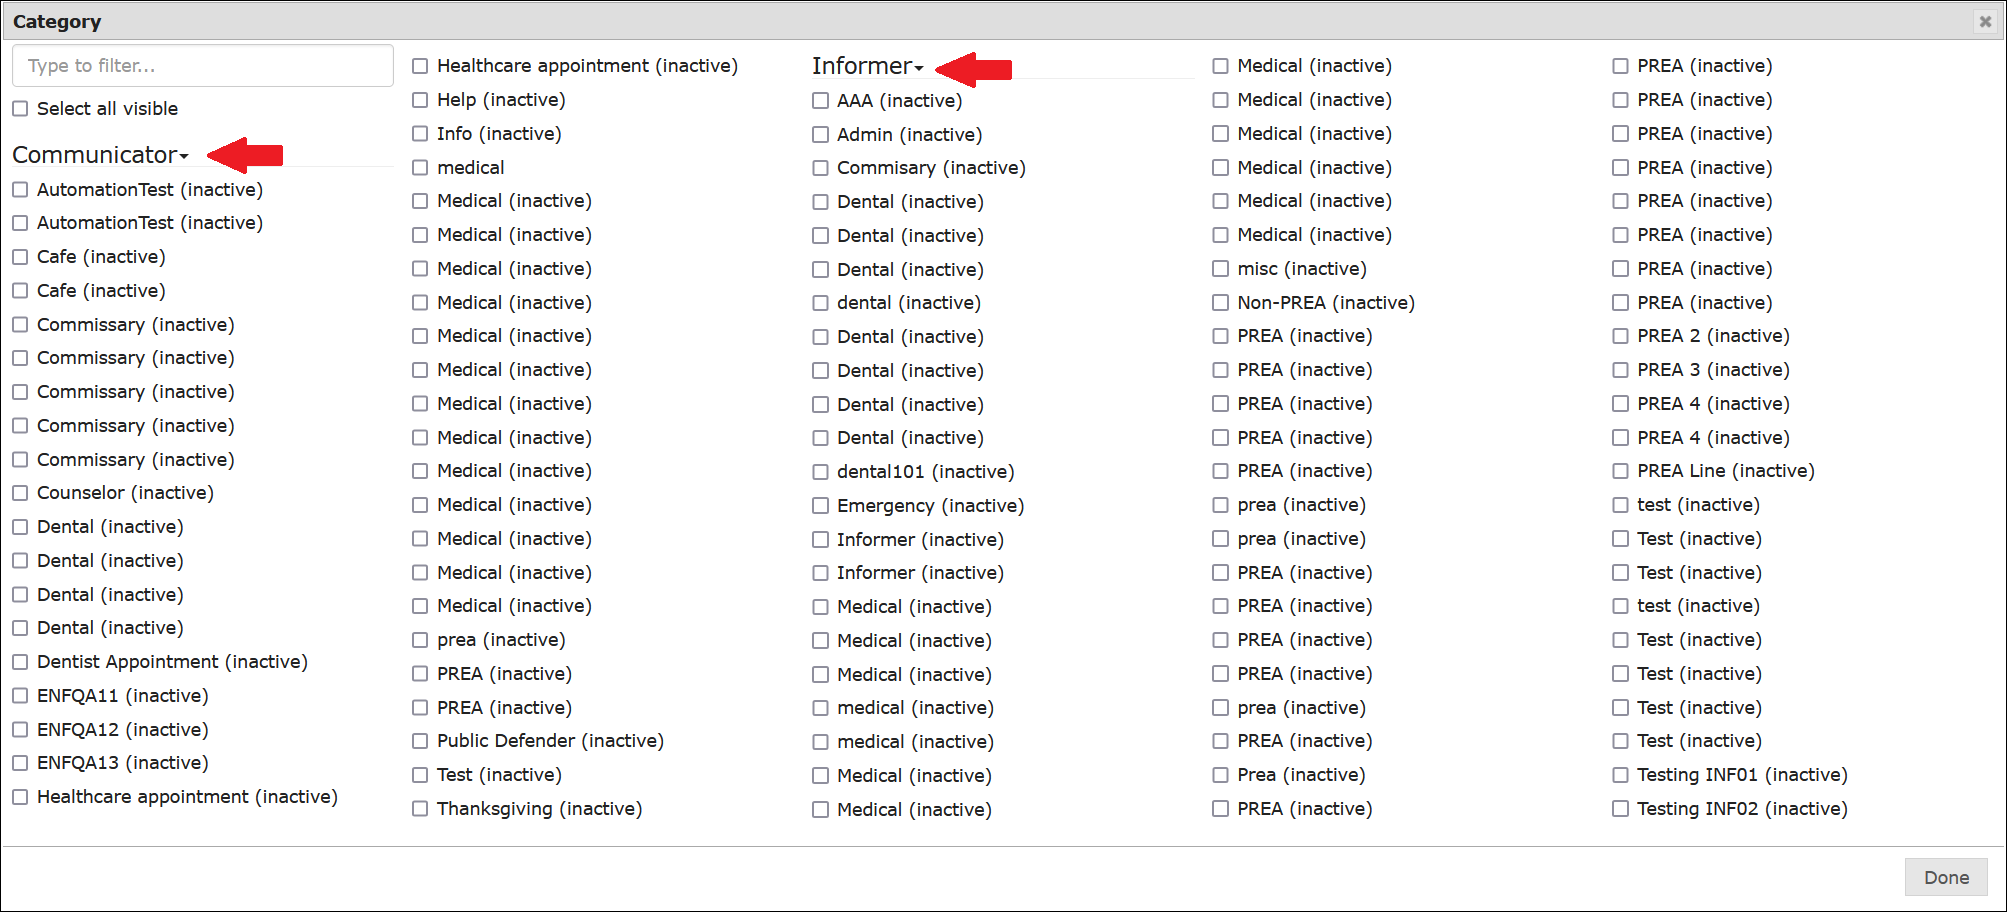
| Category | Request category or subcategory selected by the inmate, as defined by the designated Site Administrator at the facility. If The Informer℠ IVR is activated at the facility, the drop-down list accessible behind this criterion will include separate categories for The Informer℠ IVR and The Communicator℠ IVR as shown in the example immediately below this table. |
| Status | Limit the search to one or more progress statuses for each displayed inmate request or incident report. Submitted, Reviewed, Responded, or Listened. These four statuses correspond to four columns displayed in the search results. For more information, click here. |
| Site | Site or facility within a larger correctional agency. This is an optional column for multi-site agencies only. |
| Active Inmates Only | If this checkbox is selected, only requests for active inmates are listed in search results. Since all messages left by an inmate through The Informer℠ are anonymous, the inmate is not identified in search results. Therefore, if you are performing a search with the Active Inmates Only checkbox selected, no results are displayed for any category configured in The Informer℠. |
| Show Hidden Results | If this checkbox is selected, hidden search results will be displayed. These would otherwise not be displayed due to not meeting the minimum score in the Score column on search results. |
As shown in the following example, the Category dropdown list displays every category or subcategory configured in The Communicator℠ as well as any categories configured for The Informer℠ IVR.
How to search for inmate requests or incident reports in The Communicator℠
- Select The Communicator℠ under the Inmate tab.
- If you want to view requests for a specific inmate, begin entering the inmate’s last name or inmate ID in the Inmate ID or Last Name field. Select an inmate from the dropdown list.
- Click
 to select a date/time range for the search. The default range is configured for the previous calendar week, beginning at midnight of this time period and ending at the current date and time.
- Optionally, you can select a different date range from the Date Ranges dropdown list.
- To limit search results using one or more optional search criteria, click More Search Criteria. Select one or more optional criteria, then use the displayed fields to limit your search using those criteria.

- Click Search. The Communicator℠ displays a list of search results.

- To clear all search criteria and start over, click Clear.

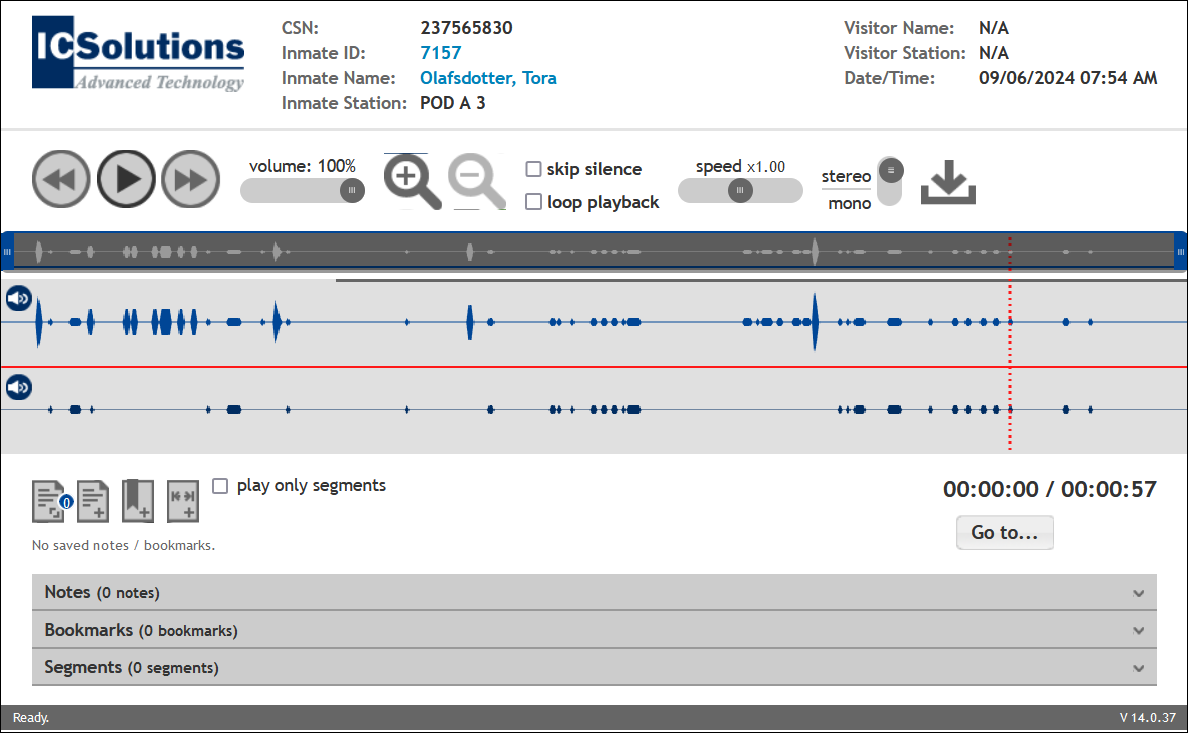
- To listen to the recording of an inmate request, click
 to listen to the recording using the Web Player.
Working with Search Results
The different column headings in the search results displaying in The Communicator℠ search results enable the administrator to quickly determine the current progress status for each request by checking the following column headings from left to right: Submitted, Reviewed, Responded, and Listened.
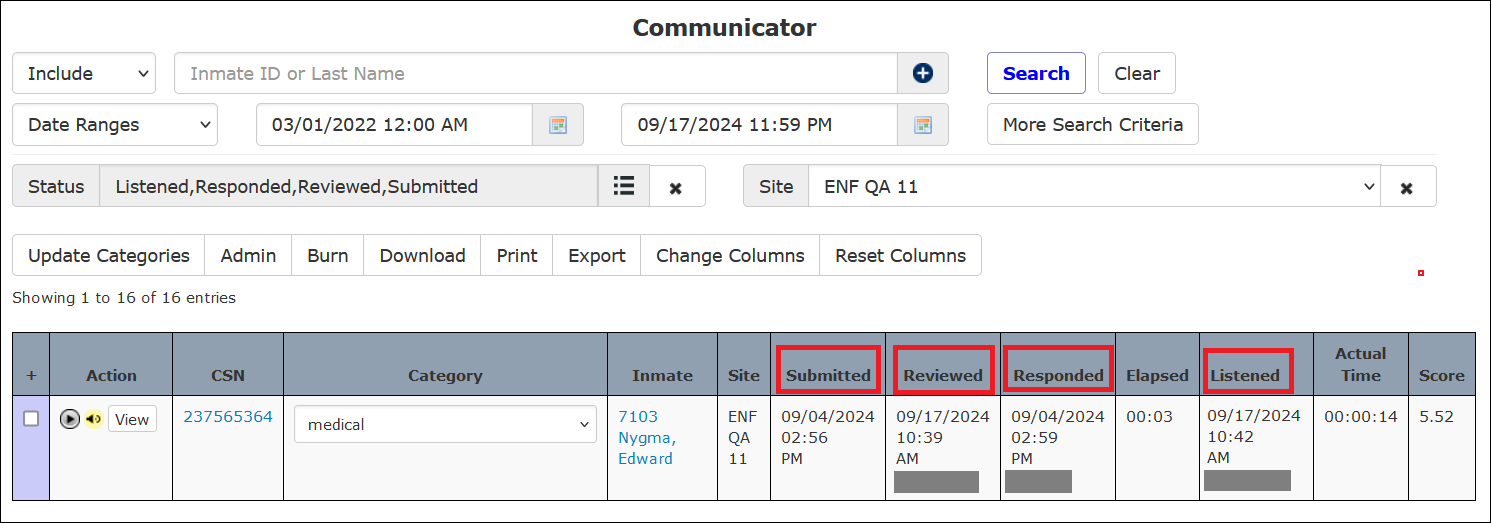
These columns show the date/time of each event's occurrence as well as the username of the administrator who reviewed and responded to the inmate request or incident report.
The following table describes the search criteria and column headings displayed in the search results on theThe Communicator℠ page.
The Communicator℠ Results page – Default Column Headings and Icon Descriptions
| Heading | Description |
|---|---|
| Action column | The following icons may be displayed in the Action column: • The inmate has left a recorded message in The Communicator℠ IVR or The Informer℠ IVR. Click this icon to open the Web Player to listen to the recording of the inmate request or reported incident. • This icon indicates that you have listened to the inmate recording. • This icon indicates that another user or other users have listened to the inmate recording. • This icon indicates that you and another user or other users have listened to the inmate recording. • After you have listened to the inmate recording, click this button to open the response screen where you can create and send a response message. • After sending the response message to the inmate, click this button to view the text of the reply message posted to the inmate’s voicemailbox. |
| CSN | Call Sequence Number of the inmate’s request call. |
| Category | Request category or subcategory selected by the inmate, as defined by the designated Site Administrator at the facility. After you have listened to the inmate recording, you can change the Category for an inmate request or incident report. For more information, click here. |
| Inmate | Inmate ID and name of the inmate making the request. |
| Submitted | Date/time the inmate submitted the request or reported the incident through the IVR. |
| Site | This optional column is displayed only for a site or facility within a larger correctional agency to identify the site where the inmate is located. This is used for multi-site agencies only. |
| Reviewed | Date/time that the request message was listened to and the username of the administrator who listened to the message. After an inmate recording has been listened to, it is displayed in the Action column. This button can view the text of the response message sent to the inmate. |
| Responded | Date/time the response message was sent through The ENFORCER® and the administrator's username who responded to the request message.
After a reply message is sent, |
| Elapsed | The amount of time (hh:mm) between the inmate submitting the request and the administrator’s response to the message. |
| Listened | Date/time the inmate listened to the response message. |
| Actual Time | The total time in seconds of the message left by the inmate. |
| Score | Shows the audio score given to the call, which The ENFORCER® used to validate the message. |
Changing Columns on The Communicator℠ Search Results
Before or after submitting a search, you can click Change Columns to display a dialog box that lets you add or delete columns of information on the search results. When you open the dialog box, a default set of checkboxes is pre-selected based on the most frequently used information about inmate requests or incident reports. After you add or delete columns by selecting or deselecting displayed checkboxes, the search results refresh immediately with the revised column headings.
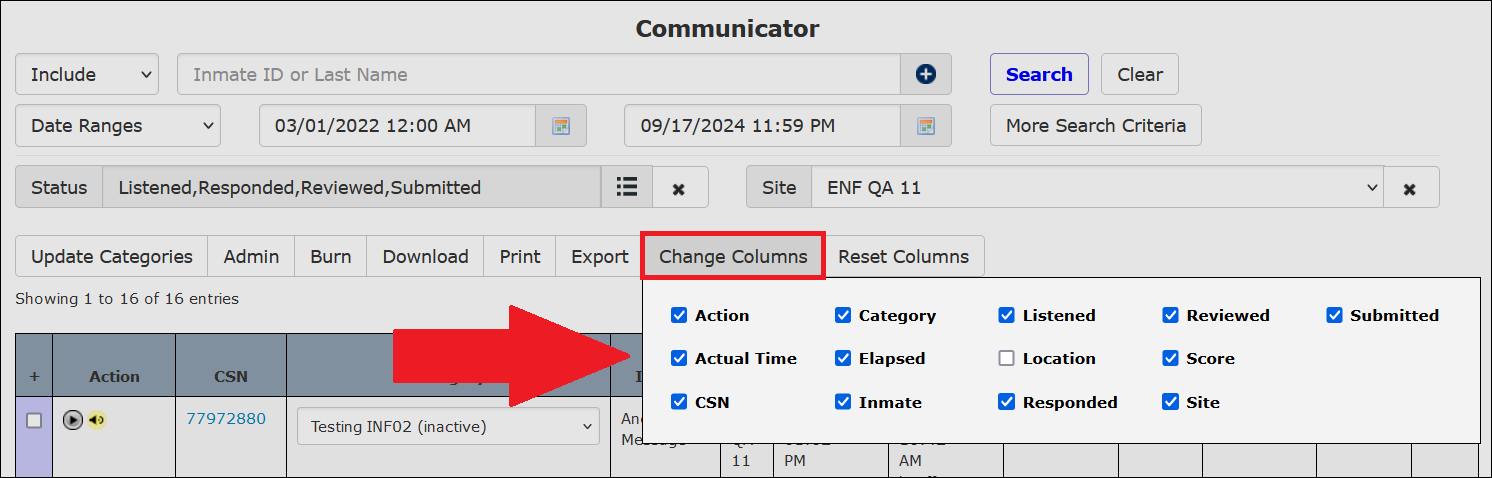
In the Change Columns box, columns are listed in alphabetical order from top to bottom.
If your correctional facility is a site or facility within a larger multi-site facility, such as a state Department of Corrections, you can select the Site checkbox to display the Site column on The Communicator℠ search results.
If your facility receives inmate housing location information from a data feed from a Jail Management System (JMS), you can select the Location checkbox to display the Location column on The Communicator℠ search results. This column displays the housing location of an inmate as of the time they placed the call. This column will display only at agencies that have the Location field enabled in the General Information pane on the Inmate Detail page. For more information, click here.
After you have made changes to the columns displayed, you can click Reset Columns to return to The ENFORCER® default settings.
Changing a Category for an Inmate Request
After you perform a search to locate the desired inmate requests and after you have listened to the inmate recording, you can change the category on any item. You should take this action only if an inmate submitted a request under the wrong category. For example, if the category is Guard Complaint and the inmate’s recorded message is actually reporting a complaint about the facility, you can use the dropdown list in the Category column to change the category for the request.
How to change a category on an inmate request in The Communicator℠
- Select The Communicator℠ under the Inmate tab.
- Perform a search using the desired criteria.
- On the line item for the miscategorized request, click on the right side of the dropdown list in the Category column.
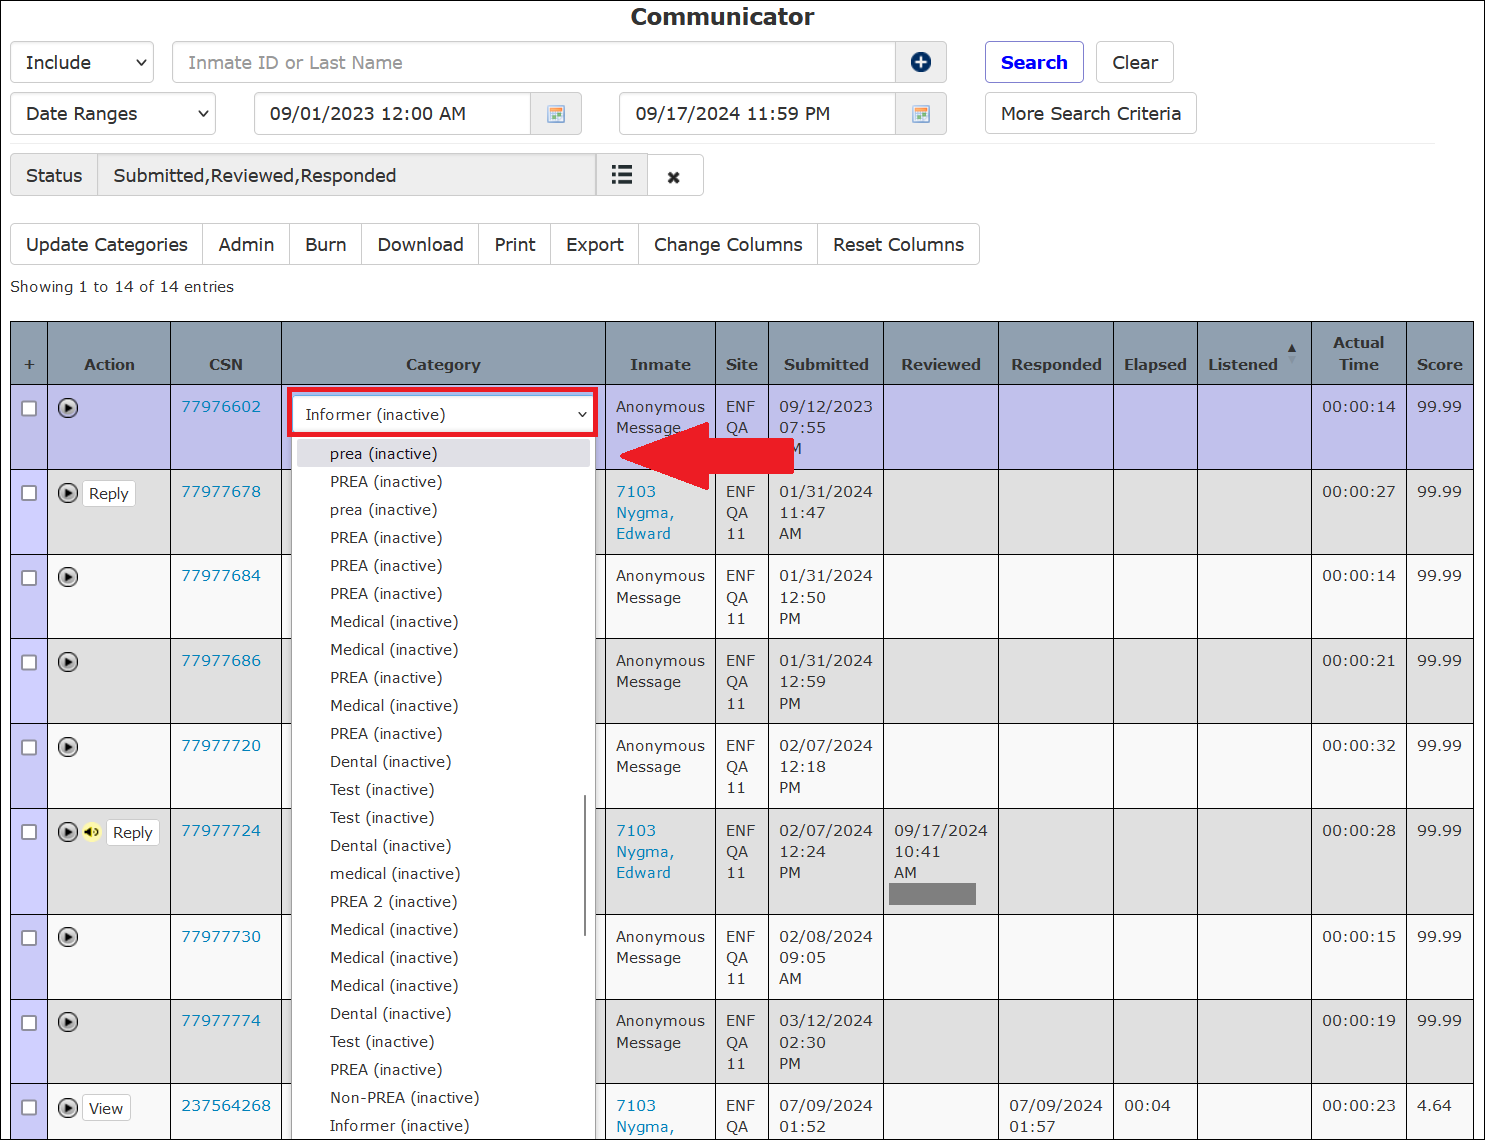
- Select the correct category from the displayed list.
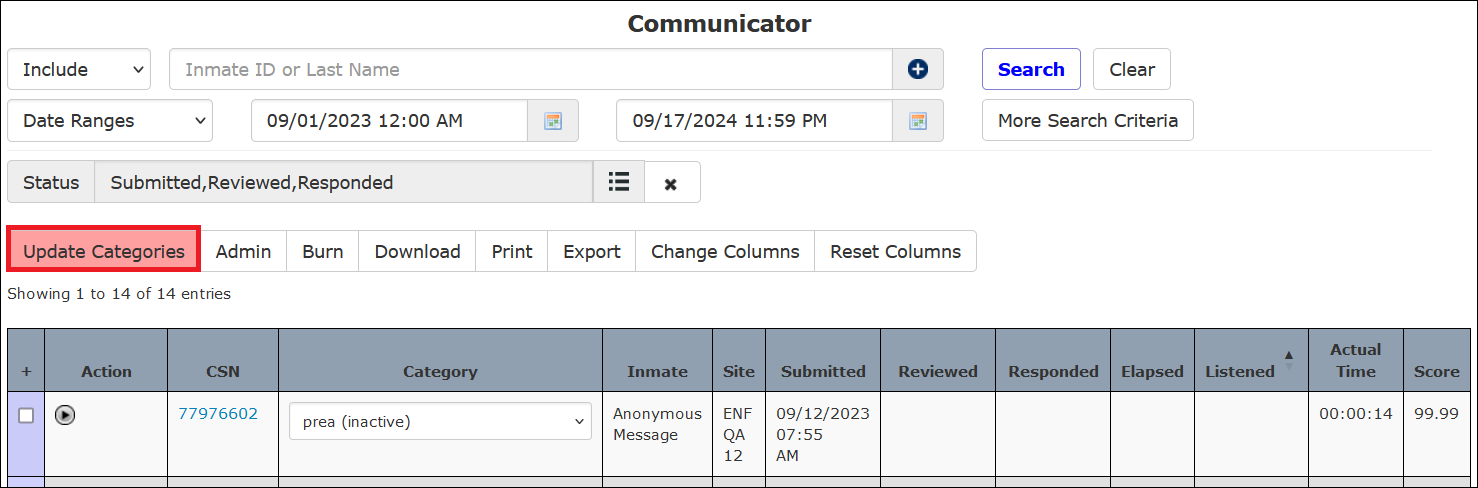
- At the top of the displayed search results, click Update Categories.
Responding to an Inmate Request
When you post a reply to an inmate request, The ENFORCER® uses a text-to-speech conversion process that converts the typed response into a synthesized voice message. This reply message is then posted to the inmate’s voicemailbox, and the inmate is notified of the message the next time he/she uses The ENFORCER® to place a call.
After you review an inmate request and click ![]() in the Action column on a line item, the following dialog is displayed.
in the Action column on a line item, the following dialog is displayed.
![]()
Enter a response message, then click Submit as shown in the following example. This action will convert your text message to a recorded message, which is then posted to the inmate’s voicemailbox in The ENFORCER® IVR.

How to respond to an inmate request in The Communicator℠
- After reviewing the inmate request, click
 in the Action column for the line item.
 - Type in your response message in the provided field.
Since your message will be synthesized to a voice message, you should not use non-standard abbreviations or word shortcuts.
- If you want to save the message for use as a response to future requests, click the Save your message to standard messages checkbox. If you perform this action, the message will be added to the Select a standard message dropdown list for future use.

- Read your typed message to ensure accuracy.
- Click Submit. The ENFORCER® will convert your text to a recorded message and will post it to the inmate’s voice mailbox.

- Additionally,
 will be displayed in the Action column for the line item. You can click to view the text of the message you submitted.
After the inmate listens to the message, the date/time will be displayed in the Listened column for the request, and the elapsed time will be posted in the Elapsed column.
Viewing Response Disabled Messages on The Communicator℠ Search Results
If the category for an inmate voice message is set as Response Disabled on The Communicator℠ Admin page, the following columns on The Communicator℠ page will be blank:
- Responded – Since responses are disabled, there is no response date/time.
- Listened – Since responses are disabled, the inmate cannot listen to a response.
- or in the Action column – Since The ENFORCER® user cannot reply or view a reply, these buttons will not be displayed on the line item.
Viewing Informant Calls on The Communicator℠ Search Results
From The Communicator℠ page, you can view a list of all voicemail informant calls made to The ENFORCER® using The Informer℠ module.
Additionally, you can limit a search to a specified category in The Informer℠. Because of the anonymous nature of these voicemails, however, the following columns on The Communicator℠ page will be blank for all voice messages left through The Informer℠ IVR:
- Inmate – The inmate’s name and inmate ID remain anonymous.
- Responded – Since responses are not made to voice mail calls placed through The Informer℠ IVR, there is no response date/time.
- Listened – Since responses are not made to voice mail calls placed through The Informer℠ IVR, the inmate cannot listen to a response.
- or in the Action column. Since The ENFORCER® user cannot reply or view a reply, these buttons will not be displayed on the line item.
Adding a New Category
Only The ENFORCER® Site Administrator can add and name a category, define an inmate prompt, or disable a category. For assistance with these tasks, contact your Site Administrator.