Table of Contents
Seal Inmate Information
In a court case related to a criminal charge against an incarcerated inmate, a court judge can order the sealing of all inmate records or selected inmate call information.
To enable a correctional facility to comply with such a court order, The ENFORCER® allows an authorized user to perform two different types of record-sealing requests:
- Full Record Seal – Seal all records for an inmate, including the Inmate Detail screen, all call records, all call recordings, and any inmate data otherwise available to ENFORCER® reporting functions. Essentially, every piece of inmate information in The ENFORCER® is sealed completely.
- Partial Record Seal – Seal call records and call recordings only for a selected date range. This date range may be mandated by the court for a time window associated with events related to the case. As with other ENFORCER® functions, the authorized user can click to select a start date and end date for the call records and recordings to be sealed.
All call records and call recordings that do not fall within the date range specified by a completed seal request are still accessible for user queries and are still available for any requested ENFORCER® reports.
Authorization to request either type of record seal must be set up by The ENFORCER® Site Administrator for a designated user.
To accommodate the seal request, The ENFORCER® “clones” (copies) the inmate’s Inmate ID number and then associates either the full inmate records or selected call information with the new Inmate ID. The new Inmate ID is a unique number that contains additional characters, which prevents access to the records by any ENFORCER® user. Although the records are still stored in The ENFORCER, they cannot be retrieved unless a written request is provided to ICSolutions® by an authorized representative of the customer.
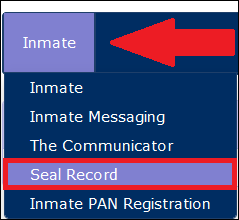
The Seal Record function is accessible by selecting Seal Record under the Inmate tab.
The steps below summarize the process for requesting a records seal.
- The first displayed screen requests the inmate ID from the user.
- After locating the inmate, The ENFORCER® requests that the user provide details on the requested type of records seal.
- Next, The ENFORCER® displays a confirmation screen that enables the user to verify all details before submitting the request.
- A final confirmation message is displayed by The ENFORCER® to verify that the seal request has been accepted and completed.
Performing a Record Seal
When you select Seal Record, a search dialog displays. In this dialog, you can enter the inmate’s last name to find the inmate whose call records you want to seal.
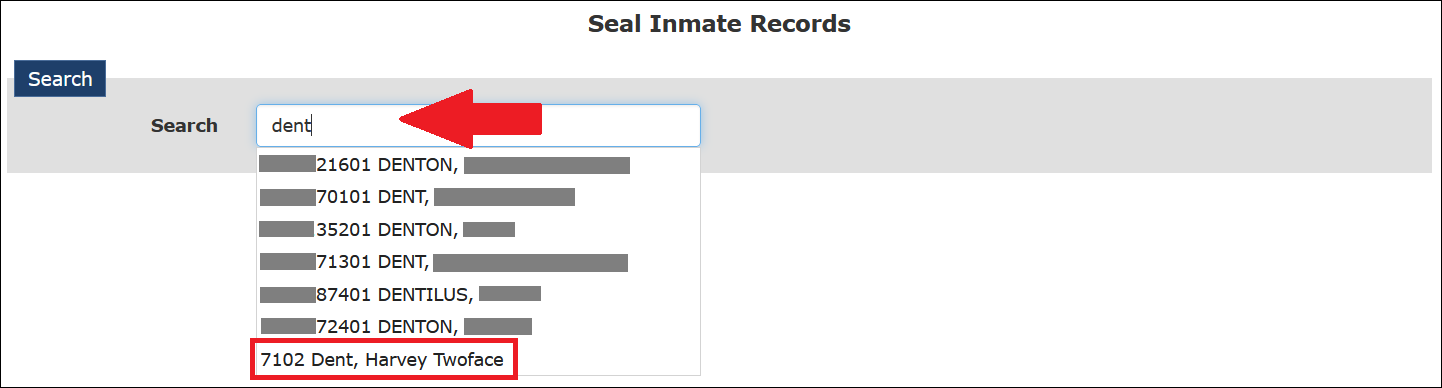
After you click an inmate's name, the inmate’s ID number is displayed in the search field. Additionally, a dialog is displayed in the following example.
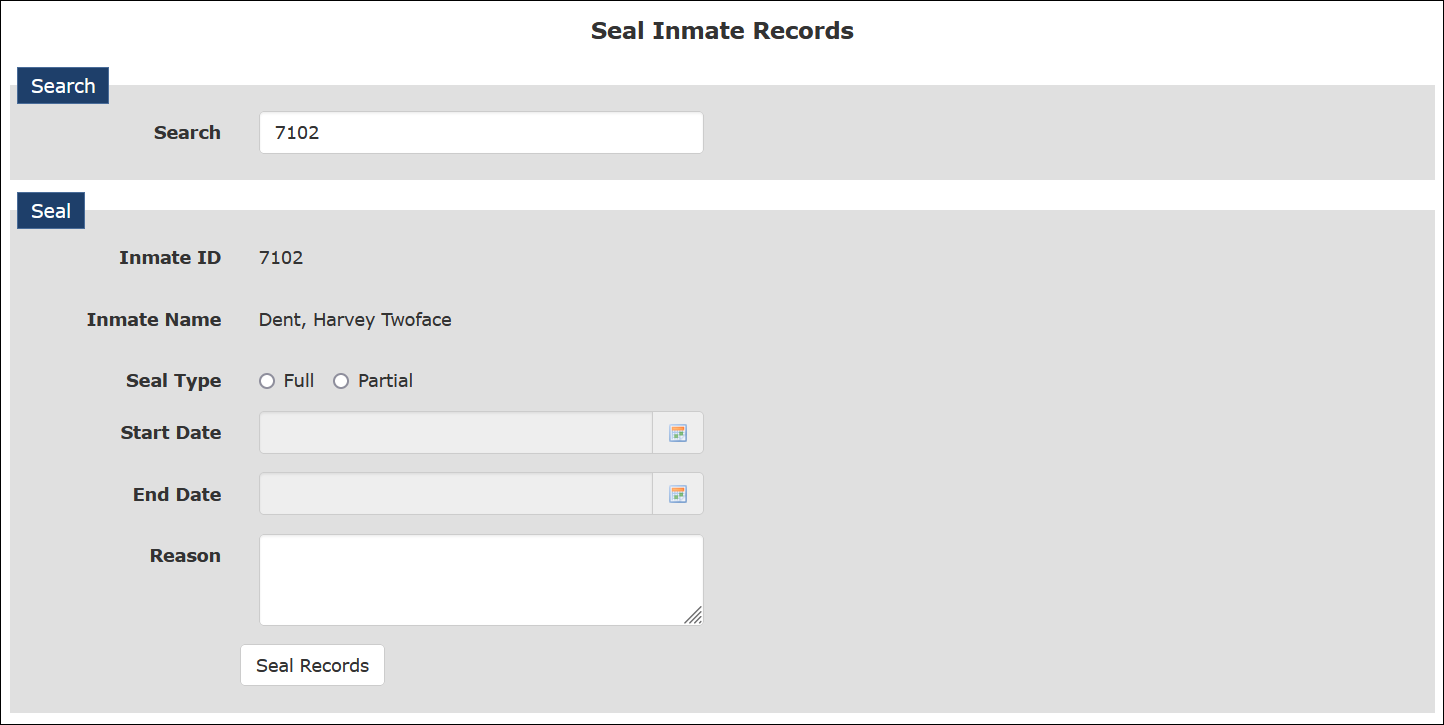
In the dialog box, you must enter the following information:
- Select the Full radio button to perform a full seal of all records for the inmate or select the Partial radio button to perform a partial seal of call records and recordings only for a specified date range.
- Select a date range if performing a partial seal.
- Enter a detailed description in the Reason field for why the seal request is being submitted.
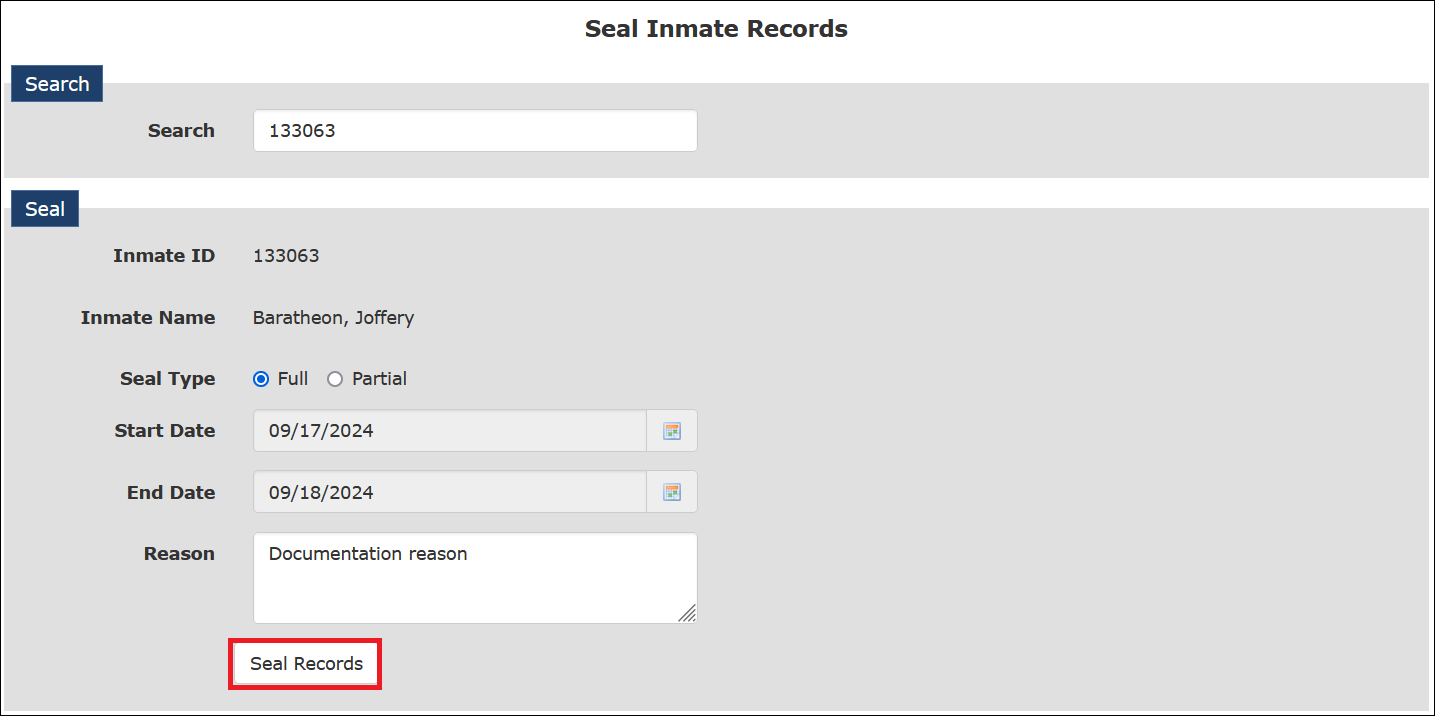
Completion of the Reason field is required for both types of seal requests and should include the name of the court, the court case number, and any identifier, such as an order number, for the issued court order to seal the inmate records or call information. If no text has been entered in the Reason field, the Seal Records button is not active and the seal request cannot be completed.
After you click Seal Records, a message is displayed to confirm that your seal request has been accepted and completed. The new inmate ID for the sealed records is displayed in this confirmation message and is prefixed with one of two letters:
- F - A full seal was performed and all inmate records are sealed.
- P - A partial seal was performed and only inmate call records and recordings captured during the specified date range are sealed.
The new inmate ID which is associated with the sealed records contains many more characters than the original ID, which makes it impossible for any ENFORCER® user to access the records.
How to perform a full seal
All inmate records are sealed.
- Select Seal Record under the Inmate tab.
- Begin typing the last name or inmate ID of the inmate for which you want to seal call records, then select the desired inmate from the dropdown list.
- Select the Full radio button.
- Enter a description in the Reason field for why the call records must be sealed.
Helpful information to enter may include:
• Inmate first and last name.
• Full name of the county or state court.
• Court case number.
• Identification number of the court order.
• Date that court order was received by the facility. - To complete the records sealing process, click Seal Records.
- After you click Seal Records, The ENFORCER® displays a confirmation dialog, which includes the new Inmate ID for the sealed Inmate Detail page.
- Per your facility’s standards, you should record or file the identification number displayed in the confirmation message.
How to perform a partial seal
Only call records and call recordings captured during a specific time range are sealed for an inmate.
- Select Seal Record under the Inmate tab.
- Start typing the last name or inmate ID of the inmate for which you want to seal call records, then select the desired inmate from the dropdown list.
- Select the Partial radio button.
- Enter a date range by clicking each
 and selecting a Start Date and End Date from the displayed calendars.
 - Enter a description in the Reason field for why the call records must be sealed.
Helpful information to enter may include:
• Inmate first and last name.
• Full name of the county or state court.
• Court case number.
• Identification number of the court order.
• Date that court order was received by the facility. - To complete the records sealing process, click Seal Records. If any of the displayed information is incorrect or incomplete, click Cancel.
- After you click Seal Records, The ENFORCER® displays a confirmation dialog, which includes the new Inmate ID for the sealed Inmate Detail page.
- Per your facility’s standards, you should record or file the identification number displayed in the confirmation message.